
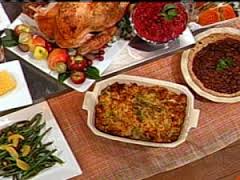
The comfort food season is here — the Holiday Season is a glorious time of year to re-unite with family and friends over some delicious food. However, many people overlook how stressful it can be to both prepare and eat this food — especially if you are trying to maintain a healthy weight over the holiday season. No worries, Brooke P. is here to help us get comfortable in the kitchen, showing you how to whip up a healthier version of your favorites at home.
Comfort Food
As the days get colder and shorter, it’s hard not to crave something warm and
comforting. It’s when most of us turn to hot beverages and comfort food as a way to
beat the winter blahs.
In preparing to write this entry, I did a search on Pinterest for ‘comfort food’ in the hopes
of narrowing down my recipe ideas. To my surprise, everyone seemed to have a
different idea of what they considered comfort food! Thankfully, the recipes all seemed
to have a common theme — they were a food that was warm and comforting to their
pinners. In other words, it was a food they associated with special memories or one that
made them feel happy. Another quick Internet search revealed that Webster’s Dictionary
first coined the term ‘comfort food’ in 1977:
Comfort Food noun: food that is satisfying because it is prepared in a simple or
traditional way and reminds you of home, family, or friends.1
From a dietitian’s perspective, comfort food can be a double-edged sword. On the one
hand, food fuels our bodies and should be an enjoyable part of life. We encourage
mindful eating as a tool to savor all food while maintaining a healthy body weight. On
the other hand, we also discourage emotional eating — eating for reasons other than
hunger. So, when it comes to comfort food, how can one enjoy foods that are
traditionally (though, not always) high in fat and calories and still maintain a healthy
weight and lifestyle? The first is to enjoy your “comfort food” only occasionally and in
moderation. The second, to “re-invent” your comfort food in a more healthful way. I
prefer the second way, but I’ll leave it up to you to decide.
One of my favorite comfort foods, Chicken Soup with Dumplings, leaves little to reinvent,
as it is traditionally not a high-fat, high-calorie food. It is, however, a little time
and labor intensive — another part of what makes it a comfort food. The key to making
the broth extra rich is to use a hand-blender to puree the celery, onions and garlic into
the stock. (It is also a way to sneak some extra vegetables into my kids!).
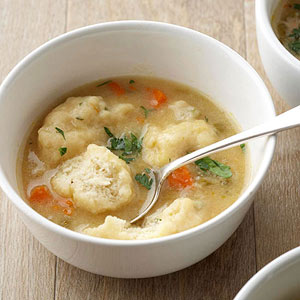
Chicken Soup with Dumplings
Ingredients
• 1-2 tablespoons olive oil
• 1 whole (5 to 6-pound) chicken, skin on, cut into 10 pieces (cut breasts in half) Note:
You can buy whole, cut-up chickens at most grocery stores, then just halve the
breasts, so the pieces are all of similar size.
• 2 cloves garlic, finely chopped
1 Comfort Food (definition) Merriam-webster.com, accessed November 13, 2013.
• 1 onion, diced
• 4 stalks celery, diced
• 1 pound carrots (approx. 10 carrots), peeled and sliced into 1/4 inch rounds (or a 16
oz. bag of baby carrots, sliced)
• 1 tablespoon dried thyme
• 1 tablespoon dried parsley
• Ground black pepper, to taste
• 6 cups water
• 6 cups low-sodium chicken stock
Preparation
Soup:
• In a large stockpot over medium-high heat, add olive oil and saute the onion, garlic
and celery until translucent, approximately 10 minutes.
• Add the chicken pieces, water, stock and herbs and simmer over low heat for 45
minutes, or until chicken is fully cooked. (An instant thermometer should read 165° F
at the thickest part.)
• Remove the chicken from the stock to a cutting board and let cool.
• Use a hand-blender (It could also be put into a regular blender in batches.) to puree
the stock until smooth.
• Add carrots to the pureed stock and cook until fork tender, approximately 10-15
minutes.
• When the chicken is cool enough to handle, pull it from the bones and cut into bitesized
pieces.
• Drop dumpling mixture into the soup by the tablespoonful and cook until they rise to
the top and are cooked through, approximately 5-10 minutes. (Note: The dumplings
are very delicate and will break apart if you move them too much.)
Dumplings:
1 cup all-purpose flour
2 teaspoons baking powder
1/2 teaspoon salt
1 egg
Milk
1 teaspoon dried thyme
1 teaspoon dried parsley
Black pepper to taste
• In a medium-sized bowl, combine the flour, baking powder, salt and herbs.
• Add an egg to a 1 cup liquid measuring cup. (The egg will measure about 1/4 cup.)
• Fill the rest of the measuring cup with milk until it reaches the 1 cup mark.
• Slowly combine the wet ingredients into dry ingredients until a moist dough forms.
• Drop the dough by heaping tablespoons into the soup.
For another simple, comforting soup, I turn to Cooking Light’s version of Baked Potato
Soup. With leftover baked potatoes (which can also be done in the microwave), it
comes together quickly. Leave the potato skins on for extra fiber!

Baked Potato Soup
Ingredients
• 4 baking potatoes (about 2 1/2 pounds)
• 2/3 cup all-purpose flour
• 6 cups 2% reduced-fat milk
• 1 cup (4 ounces) reduced-fat shredded extra-sharp cheddar cheese, divided
• 1 teaspoon salt
• 1/2 teaspoon black pepper
• 1 cup reduced-fat sour cream
• 3/4 cup chopped green onions, divided
• 6 bacon slices, cooked and crumbled
Preparation
• Preheat oven to 400°.
• Pierce potatoes with a fork; bake at 400° for 1 hour or until tender. Cool. Peel
potatoes; coarsely mash. Discard skins.
• Lightly spoon flour into a dry measuring cup; level with a knife. Place flour in a large
Dutch oven; gradually add milk, stirring with a whisk until blended. Cook over medium
heat until thick and bubbly (about 8 minutes). Add mashed potatoes, 3/4 cup cheese,
salt, and pepper, stirring until cheese melts. Remove from heat.
• Stir in sour cream and 1/2 cup onions. Cook over low heat 10 minutes or until
thoroughly heated (do not boil). Sprinkle each serving with cheese, onions, and bacon.
My other favorite comfort food is homemade bread. Nothing beats a warm, crusty loaf
on a cold winter day. For those of you who aren’t afraid of using yeast, this is one of the
simplest recipe for achieving my ultimate comfort food, and it can be modified to include
your favorite add-ins like cranberries and walnuts, cinnamon and raisins or something
savory.
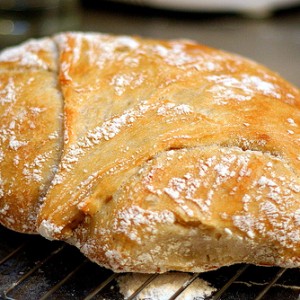
No-Knead Bread
Adapted from Jim Lahey, Sullivan Street Bakery
Time: About 1½ hours plus 14 to 20 hours’ rising
(November 8, 2006)
Ingredients
• 3 cups all-purpose or bread flour, more for dusting (You may substitute some whole
wheat flour to make it healthier. Just know that the loaf will be more dense.)
• 1/4 teaspoon instant yeast
• 1 1/4 teaspoons salt
• Cornmeal or wheat bran as needed.
Preparation
• In a large bowl combine flour, yeast and salt. Add 1 5/8 cups water, and stir until
blended; dough will be shaggy and sticky. Cover bowl with plastic wrap. Let dough rest
at least 12 hours, preferably about 18, at warm room temperature, about 70 degrees.
• Dough is ready when its surface is dotted with bubbles. Lightly flour a work surface
and place dough on it; sprinkle it with a little more flour and fold it over on itself once or
twice. Cover loosely with plastic wrap and let rest about 15 minutes.
• Using just enough flour to keep dough from sticking to work surface or to your fingers,
gently and quickly shape dough into a ball. Generously coat a cotton towel (not terry
cloth) with flour, wheat bran or cornmeal; put dough seam side down on towel and
dust with more flour, bran or cornmeal. Cover with another cotton towel and let rise for
about 2 hours. When it is ready, dough will be more than double in size and will not
readily spring back when poked with a finger.
• At least a half-hour before dough is ready, heat oven to 450 degrees. Put a 6- to 8-
quart heavy covered pot (cast iron, enamel, Pyrex or ceramic) in oven as it heats.
When dough is ready, carefully remove pot from oven. Slide your hand under towel
and turn dough over into pot, seam side up; it may look like a mess, but that is O.K.
Shake pan once or twice if dough is unevenly distributed; it will straighten out as it
bakes. Cover with lid and bake 30 minutes, then remove lid and bake another 15 to 30
minutes, until loaf is beautifully browned. Cool on a rack.
Yield: One 1½-pound loaf.
For those of you who prefer to make quick bread, one of my favorites is this recipe for
soda bread from Bon-Appetite magazine (October 2000).
Molasses and Oat Soda Bread
Makes 2 Loaves
Ingredients
Yellow cornmeal
• 1 1/4 cups buttermilk (I usually use low-fat buttermilk and find it takes about 1/2 cup
more – add it a little at a time until dough just comes together)
• 1/4 cup mild-flavored (light) molasses
• 2 tablespoons vegetable oil
• 1 1/2 cups old-fashioned oats
• 3 cups unbleached all purpose flour
• 1/2 cup whole wheat flour
• 1 tablespoon sugar
• 1 1/2 teaspoons salt
• 1 teaspoon baking soda
• 1 teaspoon baking powder
• 1 cup raisins (optional)
Preparation
Preheat oven to 400° F. Lightly oil large baking sheet; sprinkle with cornmeal. Whisk
buttermilk, molasses and oil in medium bowl. Stir in oats; set aside. Mix next 6
ingredients in large bowl. Make well in center. Add buttermilk mixture and raisins. Stir
until dough comes together (It will be moist.). Let stand 5 minutes.
Lightly flour work surface. Scoop half of dough onto surface; knead gently just until no
longer sticky, about 30 seconds. Shape into 4 1/2 -inch-diameter ball. Repeat with
remaining dough. Place loaves on baking sheet, spacing evenly. Use sharp serrated
knife, make 2 parallel slashes atop each loaf, about 3/4 inch deep.
Bake loaves 20 minutes. Reduce heat to 375° F. Bake until dark and crusty and loaves
sound hollow when tapped on bottom, about 20-25 minutes. Transfer loaves to rack;
cool completely. (Can be made 8 hours ahead.)
Be it soup, bread, steak or pasta, comfort food can be many things to different people.
There is no reason to not enjoy the pleasure it brings, especially during the seemingly
endless winter months. With so many places to find recipes at our fingertips, there is
undoubtedly a healthy version of your favorite out there somewhere. If you prefer the
real thing, enjoy it without guilt — just be mindful of your portions and compliment it with
a side of your favorite vegetable!
• For a list of healthy recipe substitutions, try the Mayo Clinic’s guide to healthy recipe
substitutions.
• Also see, Cooking Light (March 2012) for some healthy takes on Comfort Classics.
Written by: Brooke Pearson, MPH, RDN, LD
November 2014

Thank you, Brooke! Have a Happy Thanksgiving Break Everyone!!