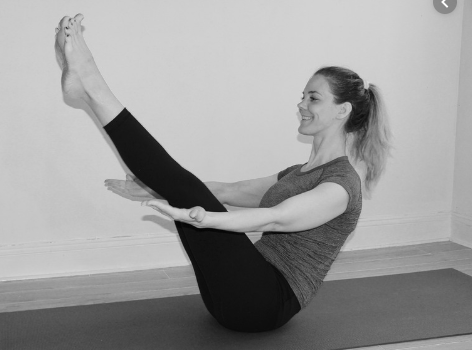
Strengthen: Back, Buttocks/Hips, Shoulders with no equipment!
Level of difficulty: Easy
www.acefitness.org/education-and-resources/lifestyle/exercise-library/53/contralateral-limb-raises

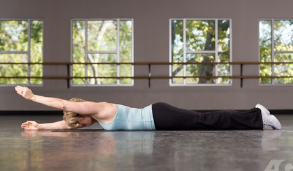
Strengthen: Back, Buttocks/Hips, Shoulders with no equipment!
Level of difficulty: Easy
www.acefitness.org/education-and-resources/lifestyle/exercise-library/53/contralateral-limb-raises
The fitness tracker trend is in full swing. But are they right for kids? Learn why you might want to measure kids’ activity levels–and when you shouldn’t.

Seeing fitness trackers everywhere? That’s no surprise. Between 20-40% of American adults use “wearable fitness devices” or fitness trackers, and the trend is expanding to include kids, too.
Fitness trackers promise a world of ease and progress in physical fitness. They help us make incremental improvements, nudge ourselves to be active, and celebrate personal bests.
But when you watch your eight-your-old bounding across the back yard with his friends, you might struggle to see how the fitness tracker mentality applies to kids. Do you want your kids to enter into the tech-heavy world of fitness tracking? Or is it better for them to play and move free of devices?

Wearable devices don’t automatically help your kids, and they might even carry the potential for harm. Here are four times a fitness tracker probably isn’t right for your kids.
Strength or resistance training challenges your muscles with a stronger-than-usual counter-force, such as pushing against a wall or lifting a dumbbell or pulling on a resistance band. Using progressively heavier weights or increasing resistance makes muscles stronger. This kind of exercise increases muscle mass, tones muscles, and strengthens bones. It also helps you maintain the strength you need for everyday activities — lifting groceries, climbing stairs, rising from a chair, or rushing for the bus.
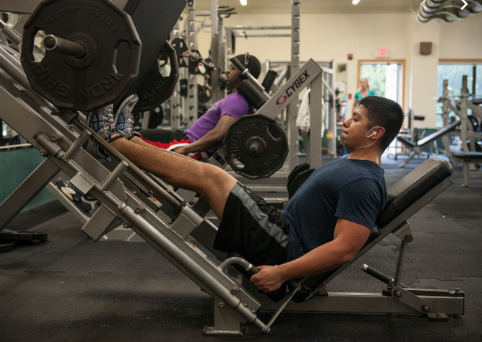
The current national guidelines for physical activity recommend strengthening exercises for all major muscle groups (legs, hips, back, chest, abdomen, shoulders, and arms) at least twice a week. One set — usually 8 to 12 repetitions of the same movement — per session is effective, though some evidence suggests that two to three sets may be better. Your muscles need at least 48 hours to recover between strength training sessions.
These seven tips can keep your strength training safe and effective.
We often underestimate the importance of regular stretching. Or think that it’s only for people who are flexible, do yoga or play regular sport. But some studies suggest that, along with other forms of regular exercise, stretching could help you to relax, increase your flexibility, reduce lower back pain, and help to manage some other health conditions.
These tips can help you run safely.

It’s best to get fitted for running shoes by a trained professional. They can help runners get shoes that:
Minimalist shoes are becoming popular, but there’s no evidence that they’re better than regular running shoes.
Running socks come in a variety of materials, thicknesses, and sizes. Avoid socks made from 100% cotton. When cotton gets wet, it stays wet, leading to blisters in the summer and cold feet in the winter. Instead, buy socks made from wool or synthetic materials such as polyester and acrylic.
To prevent injuries while training or running:
It’s important to stay alert while running outdoors. Don’t wear headphones or earbuds or anything else that might make you less aware of your surroundings. Staying safe while running involves the same common sense used to stay safe anywhere else, like avoiding parked cars and dark areas, and taking note of who is behind you and ahead of you.
Runners should carry a few essentials, such as:
Other safety tips:

To stay comfortable on a cold-weather hike, it’s critical to wear the right clothing and carry the right gear.
Wear layers: Layering is a three-part system that includes a base layer that wicks perspiration away from your skin, a mid layer that insulates you from the cold and a shell layer that keeps wind and moisture out. The goal with layering is to add and remove layers throughout your hike so you can stay warm and comfortable without overheating and getting sweaty. It can feel like a chore to stop and change clothes, but it’s really important to stay dry. Getting wet on a cold day can possibly lead to hypothermia.
Say no to cotton: When cotton gets wet, it takes a very long time to dry, which can leave you feeling damp, cold and miserable. Synthetic and wool layers dry much faster and will move perspiration away from your skin.
Cover your skin: Any skin that is exposed to freezing temperatures and cold wind is prone to frostbite. Take special care of your nose, cheeks, ears, fingers and toes.
Avoid tight clothing: Wristwatch bands, cuffs of gloves, gaiters and boots that are too tight can cause poor circulation, which can increase your chance of getting frostbite. Make sure your clothing and gear fit properly.
Add heat: Hand warmer and toe warmer packets are a great way to warm up your digits, especially if you’re prone to cold fingers and toes.
Wear a hat: You can lose heat through the top of your head, so pull a winter hat on if you’re feeling chilly.
Keep snow out with gaiters: If your hike will take you through deep snow, gaiters are a must for keeping snow out of your boots. They also add a bit of warmth. Be sure to use waterproof/breathable gaiters for hiking in snow.
Bring goggles or sunglasses: Always protect your eyes from the sun and wind. Many goggles and some sunglasses allow you to swap lenses in and out so you can select the right lens tint for the weather.
Pack a headlamp: If you’re hiking in winter, you’ll have less daylight hours, especially if you’re in the northern part of the U.S. You don’t have to end your trip when the sun goes down, but you must be prepared to hike in the dark. Have a sense for how many hours of usable daylight you have and always pack a headlamp with fresh batteries.
Keep batteries warm: Cold weather can kill batteries quickly. Lithium batteries tend to hold up better in cold temperatures than alkaline batteries, but no matter what battery type you use, it’s best if you try to keep them warm. Stowing your headlamp, GPS, cellphone and other electronics in a pocket close to your body can help.
Apply sunscreen: Just because it’s cold out doesn’t mean you stop worrying about sunburn. In fact, if there’s snow on the ground, the sun’s rays can reflect back up at you, so you need to be diligent about applying sunscreen on the underside of your nose and chin and around your neck.
 This exercise will strengthen your upper arms. If your shoulders aren’t flexible enough to do this exercise, try the Chair Dip.
https://go4life.nia.nih.gov/exercise/elbow-extension/
acefitness.org/education-and-resources/lifestyle/exercise-library/
Link above to free access to an exercise library, including short video clips. Library includes activity/exercises for children, as well as adults.