 The Panopto Recorder allows a lot of flexibility in how and what you can record. A presenter may wish to record alone. This section will cover all aspects of recording with one computer. In this recording scenario, all presentation content (PowerPoint and/or screen capture) and video/audio is recorded from one computer.
Recording
The first step in presenting from the Panopto Recorder is to open the application on your computer and login.
1.Choosing a folder

The first thing you can do is set what folder you wish to create this new recording in. Clicking on the ![]() icon will allow you to do just this. You can even create a new folder from here. This part is not required as you can record offline and select which folder after you have created the recording.
icon will allow you to do just this. You can even create a new folder from here. This part is not required as you can record offline and select which folder after you have created the recording.
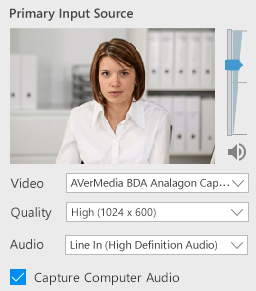
2. Choosing Primary Input
Once you have chosen your folder or are just recording offline, you must next choose exactly what you would like to record. You can select a video device, microphone, and whether or not you want to capture computer audio. You can also modify what quality the primary input source is captured at.
Note: You must at least have audio in order for the recording to be complete and usable without additional recordings.
4. Computer Audio
Panopto can now capture any audio that plays on your computer. Simply check “Capture Computer Audio” and we will record anything that plays back on your computer!
3. Screen Capture and PowerPoint
After you have selected your video and audio inputs, you can choose to also capture what is displayed on your screen and/or PowerPoint presentation.
You can also add an additional video source here if you have more than one camera plugged into your computer.
Note: In order to properly record PowerPoint presentations, please ensure PowerPoint is open and that you’re presenting in full screen presentation mode.
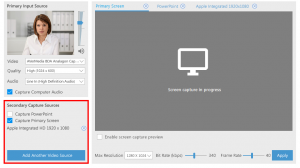
To adjust screen capture resolution simply click the drop down menu to the right of “Max Resolution” and choose the resolution you desire. You can also adjust the bit rate and frame rate by dragging the sliders shown below. Click Apply to save changes.
![]()
4. Starting, Stopping, and Pausing
Once you have everything set, you can begin recording. This is of course done by clicking on the RECORD icon to start everything running.

Once your recording has started, that icon will change into PAUSE and STOP.
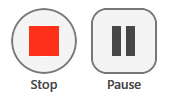
Clicking on Stop will stop the recording and close it out. If you had picked a folder before you started, it will then begin to upload the recording to whatever folder you had chosen.
The Pause button will in a sense Pause your recording. However, everything Panopto does is non-destructive. Which basically means, even though you’ve paused your video, it will continue to record, but will not show up in the final version on the website. You can, however go into the editor and get this recorded time back if you, for example, forgot to un-pause and didn’t get the end of your recording.
5. Recording Status
Once everything has been recorded and you have stopped your recording, you will be taken to the recording status page which will show you something that looks like:
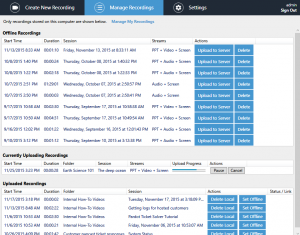
Offline Recordings are recordings that you have not yet picked a folder for, so they are just on your computer.
Currently Uploading will show the video that you just completed and it’s status.
Uploaded will show the recordings that you have already recorded, picked a folder for, and uploaded to the server.
You can see that it is possible to delete recordings. If they have been uploaded already, you can delete local and the recording will still be located on the server. If you delete a recording that has not yet been uploaded, that recording will be lost.