Tag Archives: PC

2. Installing PC Recorder

InformationThis document will walk you through installation of the Focus Recorder on a Windows based computer. 
The software can generally be run successfully on any computer that can run Windows Vista, Windows 7, and Windows 8.1 with the biggest consideration being given to having plenty of hard drive space available for long lectures.

Specifications

  • Windows Vista / Windows 7 / Windows 8.1
    (32 and 64 bit) / Mac OSX 10.6(and above)
  • Adaptive Streaming Capture Format Disabled: Core 2 Duo 1.8ghz / 2GB RAM (recommended)
  • Adaptive Streaming Capture Format Enabled: Standard/High: Intel i3 2.5 ghz or 2.6ghz AMD Phenom IIX4 910.Ultra: Intel i7 2600 Processor (3.4GHz) or 3.2ghz AMD Phenom II X6 1090T
  • Mac: Intel CPUs required
  • Microsoft .NET Framework 3.5 SP1
  • Recording Quality Options: High– 540MB/hr, Standard– 135MB/hr
  • FireWire ports for digital cameras
  • Windows Media Player 10 (or higher) required for broadcast
  • USB ports for Webcams or other recording devices
  • Disable sleep mode, screen savers and scheduled tasks

Installation

Step 1.)  Go to butler.hosted.panopto.com and click on “Log In”.  Choose Moodle, from the “Log In Using” drop down box. Log into Moodle using your Butler credentials. You will be automatically redirected to the Sessions page.

Step 2.) You can download the Recorder by clicking on the “Download Recorder” button on the Portal Page

rtaImage

You could also click this button as well, located in the top right of the sessions page.

rtaImage (1)


Both options will show a popup that will allow you to download the Recorder for your operating system.

 rtaImage (2)

Step 3.) Locate PanoptoRecorder.exe that you’ve downloaded and run the application

Step 4.) The installer will self extract and begin the installation.

Step 5.) Select a destination folder to install the recorder to. Click Next.

rtaImage (3)


Step 6.) Click Install and the installation will begin.

rtaImage (4)


Step 7.) Once the Recorder is installed you will be able to open the software. Login using the proper Server Address, Username and Password. (This information can be obtained from a Panopto Administrator at your organization).

rtaImage (5)


3. Edit Recording with External Editor-PC

InformationAs more and more AV professionals in businesses and universities use Panopto, we’ve received a growing number of requests for the ability to edit Panopto recordings using these and other external editors.

So in the latest release of Panopto, we’ve included a feature that enables this capability. Below is an overview of how AV teams and videographers can use the feature to make more advanced edits to their Panopto recordings.

Output Panopto Recordings to MP4 Files

The first step to editing Panopto recordings in an external editor is to enable a setting in the Panopto Windows Recorder. This setting instructs Panopto to capture recordings as local MP4 files which can then be imported into a Video editing solution of your choice and uploaded into Panopto. To do this, navigate to the Settings tab in the Panopto Recorder, then to the Advanced Settings sub-tab. Check the Capture in MP4 format checkbox and click Save.

User-added image

Once this is checked, click “Save” and thereafter, every stream recorded using Panopto will be output as an individual MP4 file, encoded using the H.264 video codec and the AAC audio codec.

Making Changes to a Single-Stream Video

To edit a Panopto recording that consists of a single video stream (typically a simple webcam video with audio, or a screen recording with audio):

1.  Navigate to the folder on your hard drive where your Panopto recordings are stored. By default, Panopto uses C:\PanoptoRecorder. Within this directory, you’ll see a list of subdirectories. Each subdirectory contains a Panopto recording.

User-added image

2.  To find the subdirectory that includes the recording that you want to edit, compare the Date created column in Windows Explorer to the Start Time column in the Windows Recorder’s Recording Status tab:

User-added image

3.  Open the subdirectory and find the MP4 file. For a single-stream video, the filename will be: [GUID].DV.localview.mp4.

User-added image

4.  Open the MP4 file in your video editor and make any changes using the video editing software of your choosing.  In this example screenshot, we are using CyberLink PowerDirector 13.

User-added image

5.  Produce your edited video as your normally would. You can save the video in any local or network directory and name the video as you see fit. Just be sure to save your video into one of the formats supported by Panopto.

6.  At this point, you’re ready to upload your edited video to Panopto. From your Panopto website, click the Create button and select Upload Video.

7.  Drag your video into the drop-area, and the file will begin uploading, as seen below:

User-added image

8.  Once your video is uploaded, Panopto will encode it for playback on any device, and will index the contents within your video for search. If you no longer need the original copy of your video, you can delete it or set it as unavailable using Panopto’s availability windows.

Making Changes to a Video with Multiple Streams

Most Panopto recordings contain at least two video streams— the recording of the presenter, and the recording of their on-screen content. When editing one of these streams, most of the steps listed above will still apply. However, uploading the edited video will typically be done within Panopto’s web-based video editor, and you need to consider how edits to video duration impact the overall video presentation.

1.  Navigate to the directory of your Panopto recording by following Steps 1 and 2 above.

2.  In this directory, you’ll now see more than one MP4 file. Each MP4 file is one of the recorded video streams. For a typical video presentation consisting of presenter video and on-screen content, you’ll see:

[GUID].DV.localview.mp4 ← This is your presenter video

[GUID].SCREEN.localview.mp4 ← This is your screen recording

User-added image

3.  Select the video stream that you want to edit, and make changes as described in Steps 4 and 5 above.

IMPORTANT:  Your finalized and edited video file must remain the same duration as the original session if you are recording a multi-stream session (i.e. you are recording from a camera, powerpoint and/or screen capture at the same time).  Failure to adhere to this will cause problems with a multi-stream session. Contact Panopto support if you have any questions about this.

4.  When your edited video is ready to upload, you’ll typically want to import it directly into your existing Panopto recording. To do this, open Panopto’s editor by locating your recording in Panopto’s video library and clicking Edit.

User-added image

5.  This opens the Panopto editor. Click on the Streams tab and, on the bottom left side, click Add a video.

User-added image

6.  Select the edited video stream by clicking Browse and locating the file. If you’ve edited the presenter video, select Stream Type of Primary. If you’ve edited the screen recording, select Secondary. In this case, I’ve edited the presenter (primary) video. Click OK to upload the edited stream.

User-added image

7.  Panopto will upload and process the edited video stream. When processing is complete, you’ll see the video stream listed under the Streams tab.

8.  You’ll now have two versions of the stream you edited – the original, and your edited copy. The next step is to remove the original, so that only the edited version remains. To do this, hover over the original stream under the Streams tab and click Delete. You’ll be prompted to confirm the deletion. Click OK.

User-added image

9.  With your edits made, click Save in the Panopto editor. Panopto will re-encode your video presentation with the edited version of your stream.

Note: You should pay special attention if you change the duration of a video stream using an external editor, since the edited stream will no longer be in sync with the other stream from your recording. For example, if you use Adobe Premiere to trim out parts of your screen recording, the updated screen recording will have a shorter duration than the presenter video. In these cases, you’ll typically need to edit both streams in the external editor to ensure that they remain in sync.

6. Using Multiple Monitors

Information


Using Multiple Monitors for Screen Capture

Installing an Additional Monitor

To add a second monitor to your computer, you’ll need to make sure that you either have a video card that supports multiple monitors, or that your computer has more than one video card. The easiest way to determine if your video card supports multiple monitors is to look at the back of your computer and see if your card has two video ports for connecting your monitors. On a laptop, this port may be on the side of your computer.

alt


Once you have made sure that your video card can support a second monitor, follow these steps to add the additional monitor:

1.) Turn off your computer and monitor.
2.) Locate the video ports on your computer. (See illustration.)
3.) Connect the second monitor to the unused video port.
4.) Plug the second monitor into an electrical power source and turn it on.
5.) Turn on your original monitor.
6.) Turn on your computer.
7.) Windows should recognize the monitor once the computer has started. If you are prompted to install driver software, see the instructions that came with the monitor.
8.) You may need to enable multiple monitor support on your operating system. Please read your instruction manual if you do not see a display on your secondary monitor.
 
When you have confirmed that the second monitor is functioning properly, you are now ready to begin screen capturing with multiple monitors.

Capturing on multiple monitors

1.) Open the Panopto Recorder.

2.) On the lower left hand side of the recorder interface, click the check box next to “Capture Screen 2”

A new tab labeled “Screen 2” will appear, displaying the output of the second monitor.

If you’d like to only capture the output from the secondary monitor, be sure to uncheck “Capture Primary Screen.” If you’d like to remove either of these streams in the future, it can be found under the “Streams” tab in the Panopto web interface.

After naming your session and selecting a folder, hit the large “Record” button to begin your recording. In the example above, both the primary screen and the second output device will be captured.

4. Hotkeys for Windows Recorder

InformationHotkeys have been added to Recorder 4.1 as an extra feature to aid in session creating. Now you can use a few keys to toggle the start, pause, and stop functions on the Panopto Recorder even if it is minimized or not the currently active window.

Recording Hotkeys For Windows

This means you can stop recording while PowerPoint is still presenting. Likewise, you could also pause the recorder without minimizing other opened content, making your presentation look smoother.

***Please make sure no other programs will interfere with the hotkeys enabled by Panopto Recorder. The software uses F8, F9, and F10 to control recording***

F8 Key: Start Recording

Login to your Panopto Recorder as normal. Select a folder (unless you are recording offline) and session name along with any other sources you wish to use for this presentation.

Press F8 to begin recording.

***Ensure that there is at least an audio source selected.. If there is not, you will receive an error message and the recording will NOT start.***

alt

Important: You will want to test this hotkey ahead of time to ensure that all of your devices are working properly. This error message will only display if the Panopto recorder is in one of the active windows, otherwise it will remain in the task bar until selected.

Your camera may have a built in light up feature to designate that it is in use.

F9 Key: Pause Recording

Pressing the F9 key will simply pause the recording. Just like clicking the actual Pause button, this feature is non destructive and will still record content while activated; it simply creates an edit to your presentation that can be modified under the edit tab of the web interface.

F10 Key: Stop Recording

The F10 key will stop recording. If you have automatic uploads enabled, your session will be uploaded to your organizations server.

6. Launch Recorder from Web Interface

InformationThe ability to launch the Recorder from directly within your Panopto site, quickly eliminates locating the Program within your Start Menu, or the shortcut on your Desktop. This allows for an easier workflow, with less distractions.

Launching the Focus Recorder from the Web Interface

Installation & Setup

The Panopto Recorder is very small and very easy to install. It can only be installed on computers using Windows XP, Vista, 7, or 8 (32 and 64 bit). Your computer should also have a large amount of free drive space to capture your video/recording.

Launching from Web Interface

Open your Web Browser, and point the browser to http://butler.hosted.panopto.com and log in through Moodle.

Click the green Create button and choose the option to Record a new session


Click the “Launch Recorder” button that appears in the new dialog box. Clicking this passes your credentials to the Focus Recorder, and launches it, without you ever having to enter your credentials a second time.

3. Creating a Broadcast URL in Advance

Information
Generating a Webcast URL in advance is easy and only requires a few steps to complete.

Creating a Webcast URL in Advance

Generating Link

Step 1.) Log into your Panopto site.

Step 2.) Click the green Create button and choose the Webcast option

Step 3.) Choose your session name, select a folder, then check “Create.”


Step 4.) After you click “Create” this page will display your new session information.


Note the “Viewer Link” area: This is the broadcast URL that you have generated in advance that you may send to potential viewers. Feel free to copy and paste this link as needed.

Please be advised that this link will not work until you have started recording to the session in the Windows Recorder.

Recording to Session

When you are ready to record your live session open your Pantopo Recorder and login

Click the arrow to select the session you’ve setup to broadcast:

Locate your session and click “Record to this Session”

You will be brought back to the main recorder screen. Click Record when you are ready to Broadcast and viewers using your URL from above will be able to view your session Live.

3. Recorder Configuration in Windows

Information
How to configure the Windows Recorder


Recorder Configuration

Run the Panopto Recorder from the desktop (if using a Butler computer). Log into the Panopto Recorder

Once the Recorder opens, you will be taken to the “Create New Recording” tab.  To continue with configuration, please click on the “Settings” tab.

Basic Settings

System Settings

Recording Directory: This is the directory on the recording computer where all of the raw data will be stored. The default is set to C:PanoptoRecorder.

Upload when recorder is closed: The Panopto Recorder Service allowing recordings to be uploaded even while the Recorder is closed.

Use smart video capture resolution detection: Automatically determines the best resolution for the primary recording device.

Prefer primary capture device input resolution: Used to override automatic resolution if output is not optimal.

Click Save if you make any changes to System Settings.

Application Settings

Automatically Upload Recordings: This setting allows you to tell the recorder to upload video data as soon as the recording has ended. You may wish to uncheck this box if you want to wait until you have a faster connection before uploading.

Show Help Messages: This setting will enable or disable the Help messages in the highlighted area at the top of the Panopto Recorder.

Minimize When Recording: This setting will automatically minimize the Panopto Recorder when you start your recording.

Notify me when a viewer asks a question: This setting will enable a pop up window (shown below) on the recording computer notifying you when a viewer asks a question during a live broadcast even if the recorder is minimized.
 

4.0_Windows_broadcast_5

Disable hot keys: Disables hot keys (more here: http://support.panopto.com/documentation/recording/windows-recorder/recording-hotkeys-windows)

Advanced Settings

The Advanced Settings tab allows users with Panopto administrative permissions to configure additional settings within the Panopto Recorder.

Application Settings

Allow Stored Login Info:  This will allow you to save your login information at the login screen.

Advanced Capture Settings

Use Adaptive Streaming capture format (BETA): This new feature will enable adaptive streaming at HD resolutions. Note this feature is in its BETA stage.

Always set screen resolution to 1024 x 768 pixels: This setting will automatically adjust your screen display resolution to 1024 x 768 pixels anytime the Recorder is open.

alt

Click OK if you would like to use this setting.

Always capture PowerPoint as screen image: This setting helps render fonts or objects that may be present within your PowerPoint slideshow. This is useful when using custom fonts that do not exist on the server.

Fix primary Audio/Video stream synchronization: Automatically fixes audio and video syncing with Apple iSight and clones when running Windows on a Mac.

Click Save to save and apply any changes to advanced settings

2. High Quality Recordings in the Windows Recorder

InformationWhen you have the ability to create the perfect recording, it allows users to focus more on the content, and in the end produces better results. Follow these steps to ensure that you’re creating the highest quality session you can with your equipment.

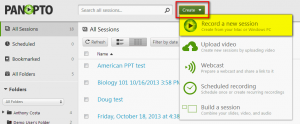
Creating High Quality Recordings

When you have the ability to create the perfect recording, it allows users to focus more on the content, and in the end produces better results. After you have a basic understand of how the Panopto Recorder works by reading the “Basic Recording” article, you can follow these steps to ensure that you’re creating the highest quality session you can with your equipment.


Environment

If you want to provide the best quality Audio/Video, you will want to make sure that you have a few things setup correctly.

Lighting

It’s best practice to have an indirect light source. Indirect light, is light coming in from all sides. It’s helpful to use some sort of reflector to abstain from having a beam of light facing directly at you. If you have a lamp, possibly put a shade over it, or place a white piece of paper over it to turn it into a source of indirect light. You don’t need to have a professional indirect lighting, you can get great results from making your own indirect light.

Sound

In order to get the best quality sound out of your Microphone, the first you will want to try to do is get rid of as much ambient noise in the room as you can. This will be very apparent once you listen to your recording. A few suggestions would be to 1) Unplug office machines in the room you’re in, 2) Place your Microphone away from your computer (PC fans may increase in speed due to the hardware usage during a recording), 3) Place a sign on the door of the room your recording in to let others know your recording.

Background

Check what is located in the backdrop of your camera! Make sure there is nothing distracting, or anything that you wouldn’t want displayed for the world to see. We recommend a solid wall, or anything that will force the viewers to concentrate on you, and not your surroundings.


Equipment

It may not always be possible to get extremely high quality equipment. However, it is possible to get the most out of the equipment you have, by adjusting the settings you have control over. If you would like more information on types of equipment that other Panopto users have had success with, please see our Equipment Guide forum.

Audio

To get the best Audio, especially in an large classroom or auditorium setting, you may want to consider using a Uni-directional microphone. This will ensure the sound that is picked up, is only gathered from one direction, instead of an Omni-directional microphone which pulls sound from every angle. Also, please ensure that all drivers for your device of choice are running the latest version. Not having the correct driver’s can, and usually will cause undesired results. These can always be found on the device manufacturer’s website.

To adjust the volume for your microphone in Windows 7 or Windows Vista, follow these steps:

1. Enter the Control Panel, and click “Sound”.

2. In the Sound dialog box, click the Recording tab.

3. Click your Microphone, and then click Properties in the bottom right corner of the dialogue box.

Note Make sure that Default Device appears under Microphone. If Default Device does not appear, click Microphone, and then click Set Default.

4. In the Microphone Properties dialog box, click the Levels tab.

5. Adjust the volume slider to the level that you want, and then click OK.

6. Click OK to close the Sound dialog box.
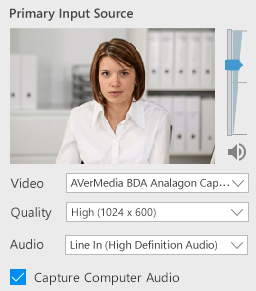
Video

When using a high-quality device, please refer to the Manufacturer’s documentation to get the most out of your device. There will be many settings that can enhance the output quality, especially with professional quality cameras. Also, please ensure that all drivers for your device of choice are running the latest version. Not having the correct driver’s can, and usually will cause undesired results. These can always be found on the device manufacturer’s website. You may also want to consider using our Smooth Stream feature. To get the most out of your Webcam / Camera, there a few simple, but important steps to consider:

– Do not use your computer monitor as a light source, especially if you wear glasses. Not only will the color of the page your displaying on your screen cause a hue to appear on your face, but will also reflect onto the lenses of your glasses.

– If your webcam has a small utility to adjust Focus / Zoom / Tilt / Pan , try adjusting those settings to get the best picture. You can use our support article for Advanced Video Settings to enable the “Video Capture Device Property Pages” that is built into the Panopto Recorder.
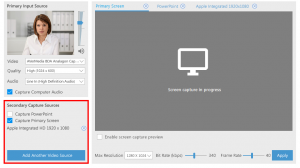
Screen Capture

The best suggestion is to match the exact display resolution that your computer is set to. Meaning, if you have a monitor that is displaying 1920×1080, you should set the recorder to match. That will make it pixel for pixel exact and it will look perfect on playback!

Computer

To get the best use of the hardware your computer has to offer, there are a few simple practices to have optimal hardware resources available. Please be advised that when using the highest Bit Rate and Frame Rate for screen capture, CPU resources can take a significant performance hit, especially when using Smooth Stream to capture. In order to receive the best outcome, we recommend at minimal, the following configuration:

Standard/High: Intel i3 2.5 ghz or 2.6ghz AMD Phenom II X4 910.

Ultra: Intel i7 2600 Processor (3.4GHz) or 3.2ghz

AMD Phenom II X6 1090T

4GB RAM

Tips

– If you’re using a laptop, make sure it is plugged into a power source, and set to high performance mode. Certain laptops enter a mode which allows for extended battery life. This may cause reduced graphics card capabilities, or reduced CPU usage. Windows includes three power plans—Power saver, High performance, and Balanced to conserve battery power, make your computer perform better, or strike a balance between the two. Unless you change the power plan, your laptop uses the Balanced power plan to automatically balance system performance and battery life

– Close all of your other applications that you’re not using. Certain applications can take a significant portion of system resources, just sitting idle.

In conclusion, every recording scenario has its own intricacies. The best way to take control of these, is to test out what configuration works best for you. After a few tests, with some setting changes, you will find the setup that works best for you.

1. Advanced Settings in Windows Recorder

InformationThe Focus Recorder contains features to fine tune your video properties. It is not recommended to modify these settings unless you are experiencing problems with the resolution or quality of your primary video feed.

 Windows Recorder Settings

To start, open the Panopto Recorder and click on the Settings tab at the top of the window.

After clicking this, you will proceed to the basic settings page.

Use Smart Video Capture Resolution Detection

This setting (default is ON) controls the video resolution configured on the primary/secondary video capture device. Smart capture resolution refers to a method of examining every possible output resolution supported by a video device to find and select the one that most closely matches the specified target resolution, without exceeding the target pixel count.  For example, if 1280×1024 is specified for the secondary source target resolution, and your webcam only supports 1280×720 and 1920×1080, you’ll get 1280×720.  If you select a target of 720×576 (“standard”) and your webcam supports 800×480 and 640×480, you’ll actually get 800×480 (because 800*480 = 384000 pixels, which is still less than the target of 720*576 = 414720 pixels).

If you turn off smart resolution detection, we just take the first available output resolution supported by the device, regardless of what you pick.  You could be asking for 1920×1080, but if the device reports 640×480 as its default resolution, that’s what you get even if it supports higher resolutions.

Prefer Primary Capture Device Input Resolution

If the “Smart Video Capture Resolution Detection” setting is unchecked, this setting does nothing. If it is checked, then this specifies the primary/secondary video capture device target resolution described above, as follows:

      • Auto (default) – Target resolution is specified by the quality setting selected in the UI.
      • NTSC – 720×486
      • PAL – 720×576
      • 720p – 1280×720
      • 1080i/p – 1920×1088

If you are having resolution difficulties on your primary feed, the  “Prefer primary capture device capture resolution” section may be the source of the problem.

– This function is primarily used when you need to override the way a camera input is displayed in the Panopto recorder.  In most cases, the “Auto” selection will detect which setting is best. If you are experiencing problems with this setting, we recommended that you refer to your recording device’s instruction manual to determine your device’s standard resolution type.
– This is especially useful for capture devices that accept multiple video inputs. You will use this function to communicate the desired resolution between the capture device and Panopto Recorder.
– The enable video capture device property page will not work with all cameras. For example, DV or HDV cameras will not make use of this function. This feature is best used with webcams and capture cards/devices.

If all else fails and you still receive a blank video feed, disable the smart video capture resolution detection by un-checking the box. Remember to hit save.

Windows Recorder Advanced Settings

To continue to the other features, click on the tab entitled “Advanced Settings.”

Enabled Video Capture Device Properties Page

The Enable video capture device property pages will allow you to access and change the native settings of your input device directly in the Windows Recorder.

alt

Check this box and hit SAVE in order to activate this feature. Then click back to the “Create New Recording” tab.

If you have a video source selected, you will see a new button with a wrench image inside of it. Clicking this button brings up the device property menu.

alt

Modifying these settings is only recommended for advanced users.

After changing any of the settings on the slider (or checking any of the boxes in the “Auto” column) make sure you click “Apply” so the settings take effect.

The same instructions apply to the next tab titled “Camera Control”

alt

This tab will modify other features of your camera as it is displayed through the Panopto Recorder.

Once again, after changing any of the settings on the slider (or checking any of the boxes in the “Auto” column) make sure you click “Apply” so the settings take effect.

After clicking “Apply” click the “OK” button when you are finished to confirm the changes and return to the “Create New Recording” page.

1. Basic Recording in Windows

InformationThe Panopto Recorder allows a lot of flexibility in how and what you can record. A presenter may wish to record alone. This section will cover all aspects of recording with one computer. In this recording scenario, all presentation content (PowerPoint and/or screen capture) and video/audio is recorded from one computer.

Recording

The first step in presenting from the Panopto Recorder is to open the application on your computer and login.

1.Choosing a folder

rtaImage


The first thing you can do is set what folder you wish to create this new recording in. Clicking on the rtaImage (7) icon will allow you to do just this. You can even create a new folder from here. This part is not required as you can record offline and select which folder after you have created the recording.

2. Choosing Primary Input

Once you have chosen your folder or are just recording offline, you must next choose exactly what you would like to record. You can select a video device, microphone, and whether or not you want to capture computer audio. You can also modify what quality the primary input source is captured at.

Note: You must at least have audio in order for the recording to be complete and usable without additional recordings.

rtaImage (1)


4. Computer Audio

Panopto can now capture any audio that plays on your computer. Simply check “Capture Computer Audio” and we will record anything that plays back on your computer!

3. Screen Capture and PowerPoint

After you have selected your video and audio inputs, you can choose to also capture what is displayed on your screen and/or PowerPoint presentation.

You can also add an additional video source here if you have more than one camera plugged into your computer.

Note: In order to properly record PowerPoint presentations, please ensure PowerPoint is open and that you’re presenting in full screen presentation mode.

rtaImage (2)


To adjust screen capture resolution simply click the drop down menu to the right of “Max Resolution” and choose the resolution you desire. You can also adjust the bit rate and frame rate by dragging the sliders shown below. Click Apply to save changes.

rtaImage (3)


4. Starting, Stopping, and Pausing

Once you have everything set, you can begin recording. This is of course done by clicking on the RECORD icon to start everything running.

rtaImage (4)
Once your recording has started, that icon will change into PAUSE and STOP.

rtaImage (5)


Clicking on Stop will stop the recording and close it out. If you had picked a folder before you started, it will then begin to upload the recording to whatever folder you had chosen.

The Pause button will in a sense Pause your recording. However, everything Panopto does is non-destructive. Which basically means, even though you’ve paused your video, it will continue to record, but will not show up in the final version on the website. You can, however go into the editor and get this recorded time back if you, for example, forgot to un-pause and didn’t get the end of your recording.
5. Recording Status

Once everything has been recorded and you have stopped your recording, you will be taken to the recording status page which will show you something that looks like:

rtaImage (6)


Offline Recordings are recordings that you have not yet picked a folder for, so they are just on your computer.

Currently Uploading will show the video that you just completed and it’s status.

Uploaded will show the recordings that you have already recorded, picked a folder for, and uploaded to the server.

You can see that it is possible to delete recordings. If they have been uploaded already, you can delete local and the recording will still be located on the server. If you delete a recording that has not yet been uploaded, that recording will be lost.