 Moodle has several ROLES you can be assigned in a particular course. This covers the various roles and their permissions as well as how to change your role to a student view. The student view is used when an instructor wants to verify what the students can see.
Category Archives: Moodle

02. Finding and hiding courses
This will show you how to find your courses and how to hide courses from view.
How can I see just my Fall 2015 courses?
You can filter the contents by selecting the ![]() drop down menu . Only courses that you are an instructor in will appear for the filter you select.
drop down menu . Only courses that you are an instructor in will appear for the filter you select.
Why are some of the courses in grey?
Courses that are in grey are not currently available to students.
How do I hide specific courses from my view?
Click on the eye ![]() next to the course that you want to hide. It will change to a closed eye
next to the course that you want to hide. It will change to a closed eye ![]() which indicates it will be hidden from your list.
which indicates it will be hidden from your list.
How do I unhide courses?
Click on ![]() at the bottom of the Moodle home screen. Click on the closed eye
at the bottom of the Moodle home screen. Click on the closed eye ![]() for any course you want to make visible (unhide). Click on
for any course you want to make visible (unhide). Click on ![]() at the top or bottom of the screen when you are finished editing your view.
at the top or bottom of the screen when you are finished editing your view.
01. What browsers are compatible with Moodle?
What browsers are compatible with Moodle?

 For best results, we recommend that you access Moodle with a recent version of Mozilla FIREFOX or Google CHROME. Additionally, it’s important to enable cookies and turn off any popup blockers in your browser.
Moodle will work in a variety of browsers, but there is some functionality within Moodle that won’t work unless you’re using a supported browser version. Read more about supported browsers, file formats and settings in our Moodle 2.8 Technical Recommendations article on the Moodle blog.
1. Importing grades from another course
I am importing a course that has gradebook items set up. Will my grades be imported correctly?
Did your original course use the Sum of Grades aggregation?
Yes!
Importing an existing course that uses the sum of grades (Natural) aggregation works just fine.
No!
If you intend to continue to use weighted mean of grades you are fine. They will import just as you had them in the original course.
What if I want to change from Sum of Grades to weighted mean of grades?
Changing aggregation from weighted mean of grades to natural will trigger a bug. Read on…
Moodle has a known bug that’s been around for a while and it still exists in the most recent version of Moodle. If a course uses a weighted aggregation scheme, switching to natural aggregation will result in undesired outcomes that are the result of a known bug. Specifically your weights will all be adjusted to a sum of 100 and items or categories that used a weighted aggregation scheme originally will be marked as extra credit.
What is the workaround to fix this if I want to change the aggregation to natural from a weighted aggregation?
First – RECONSIDER creating the gradebook from scratch! If you want to continue along this path here are the instructions to fix this known bug.
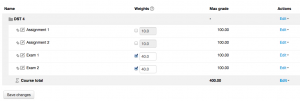
Before you begin, be sure to record your item and category weights. You can find them in the Gradebook’s Setup tab or menu link in the “Weights” column.
- From the Setup tab, click the “Edit” drop-down in the “Actions” column for the topmost row (the category for the entire course) and then click Edit settings.
- In the “Grade category” section, click the Show more… link.
- Change the “Aggregation” drop-down to Natural and click [Save changes]. All weights will be reset to zero and any value previously controlled by a different weighted aggregation will be marked as extra credit (as evidenced by the + sign next to their max grade).
- Click the “Edit” drop-down in the “Actions” column for any item or category marked as extra credit and then click Edit settings.
- In the “Parent category” section, click the Show more… link.
- Uncheck the Extra credit checkbox and then click [Save changes]. Repeat this process for any additional items or categories marked as extra credit.
- From the Setup tab, check the box in the “Weights” column for any item or category you want to be weighted.
- Fill out the “Weights” fields with the weights you recorded originally and click [Save changes].
09. The Text Editor and Accessibility
Where did the text size and color buttons go in the Text Editor?
After the Moodle 2.8 upgrade you won’t be able to adjust the size and color of text: instead, you should use the PARAGRAPH STYLES button to select an appropriate heading or use bold or italics for emphasis.
Formatting text with size and color changes alone doesn’t translate well for users with vision disabilities, or those who are accessing your course with a screenreader.
Accessibility
Use the ![]() button to check your text for accessibility compliance. You can also use the
button to check your text for accessibility compliance. You can also use the ![]() to check for screen reader compatibility.
to check for screen reader compatibility.
In addition, when you add images to Moodle using the text editor you will be prompted to enter a description of the the image automatically when you click SAVE.
This Cheat Sheet provides you an overview of the functionality available to you in the Moodle text editor. This will help you better determine which buttons to utilize as you work in Labels, Assignments, Section descriptions, and any place you can edit text.
1. Resource and Activity Setup
This review guide provides you an overview of the resources and activities available to set-up in your Moodle course or organization along with some set up times and best practices for the various items.
4. Cheat Sheet: Moodle vs Turnitin Assignments
This Cheat Sheet provides you an overview of the key differences between regular Moodle assignments and Turnitin assignments.
Moodle Cheat Sheets – Moodle Assignment vs. Turnitin Assignment
7. Change the weight of grades
How do I change the weight of grades after I’ve added them to the course? (Even after they have been graded.)
This version of Moodle makes weighting grades easy!
Click in the box next to the weight of the item that you want to change.
- Enter the weight you want for each item. In this example we changed the Exams from 25% to 40% each.
 2. Click
 ![]() .
.
8. Mass Grading
How can I assign ALL of my students the same grade for an assignment?
- Go to the assignment in the Gradebook that you want to assign the grades to. Example:
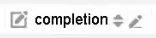
- Click on the Pencil icon
 (single view) next to the assignment.
 - This provides you with a list of all students and a Grade field for each one.

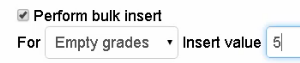
- At the bottom of the list of students you will see the option to Perform bulk insert. Check this box.
- Insert the value that you want students to receive for any empty grades for this assignment .
- Click
 .
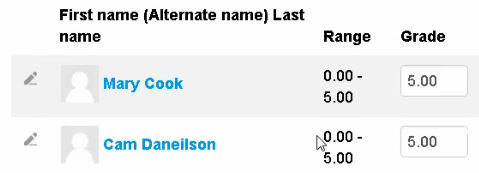
. - You will see a message indicating that all grades were updated..

- Click
 and you will see the change has been made for all students.
05. Combining Course Sections (Course Umbrella)
If you are teaching multiple sections of the same course you can combine them into one course. This is called a course Umbrella. This can make managing the courses easier if they are the same assignments and grading aggregation.
NOTE: Any activities and files you have added to your existing courses will not be included in the umbrella. We advise that you create your umbrella BEFORE you add your course material. Once you create an umbrella, you will not be able to unjoin courses from the umbrella without assistance from IT.
Only instructors and students enrolled by the “external database” method will be copied into an umbrella course. Instructors will immediately be added to the course umbrella. Students will take 24 hours to be included. Any students enrolled manually in the old courses must also be manually enrolled in the umbrella course.
To combine your courses into one umbrella
- Go to one of the courses that you want to umbrella and select
 from the Administration block under Users.
 - From the drop down menu
 choose
  .
. - Click on
 to create a new umbrella.
 - The recommended name for the New Umbrella Course Shortname will already be filled in for you. Tip: Write this name down, you’ll need it in step 4. below.
- Click on the
 button. A confirmation email will be sent to all instructors of the course with the new umbrella course’s name.
To add a course to an umbrella
- Go to another course that you would like to add to the Course Umbrella you just created.
- Follow steps 1 and 2 for this course.
- Click on
 to add this course to an umbrella.
 - Enter the Shortname (you must know this in order to join the courses) of the existing Umbrella and click .
Instructors will immediately be added to the course umbrella. Students will take 24 hours to be included.
Note: The old courses will remain in your course list, to hide them follow the instructions in the Finding and Hiding Courses QuickGuide