Category Archives: Getting Started with Adobe Connect

6. Creating a meeting in Moodle

  1. Go to Moodle Course you want to set up the meeting in.
    Click on  Turn editing on.
  2. Go to the block that you want to add the meeting to. (You can add more than one meeting to your course.)
  3. Click on Add an Activity and select Adobe Connect.
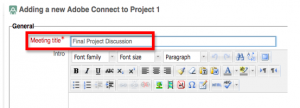
  4. Enter the name of the meeting. This is what will be displayed in your Moodle course for students to click on to enter the meeting room. Leave the Intro information blank, it will not be displayed in Moodle.Screen Shot 2015-10-07 at 8.18.03 AM
  5. The Meeting URL is optional. If you leave this blank the system will generate a random URL for this meeting. Entering a custom URL is recommended for meeting rooms that will be used frequently or for long periods of time. A custom URL can be shared with people so they can enter the room directly, without going through Moodle. A custom URL must be unique so we recommend you use your course number and a name for the meeting. See the example below.

Screen Shot 2015-10-07 at 8.19.13 AM6. Determine whether you want this meeting to be public or private by selecting the appropriate option from the pop up. A public meeting is one where anyone who has the URL for the meeting can enter the room. A private meeting is one where only registered users and participants can enter. The login page does not allow guests to log in.

7. Select a meeting template and the start and end time for the meeting. The start time must be after the current time.

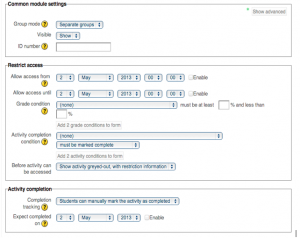
8. The rest of the settings are the common options for any activity in Moodle. Select any appropriate settings here and click on Save at the bottom of the screen.

Screen Shot 2015-10-07 at 8.20.01 AM

9.Now you have an Adobe Connect meeting room set up in Moodle.
5. Access an Adobe Connect Meeting Through Moodle

InformationAdobe Connect meetings can be accessed through a Moodle course or through the Internet. 

  1. Go to the Moodle Course or Organization where the Adobe Connect meeting has been set up.
  2. Once in the Course or Organization look for the Adobe Connect Meeting icon  Adobe Connect Meeting icon.
  3. Click on this link and you will be taken to a screen where you will see the Meeting information.  Below this information click on Adobe Connect - Join Meeting.
  4. You will be prompted to log in using your Butler credentials.  Be sure to use your entire Butler email address for the login name.
  5. Click on Adobe Connect - Enter Room.
  6. The Adobe Connect meeting room will now open in a new window.


2. Using the Audio Setup Wizard in Adobe Connect

InformationAdobe Connect includes an Audio Setup Wizard which will help you to configure, test, and volume-balance your headset or microphone for use in meetings. The Audio Setup Wizard should be used any time that you are entering a meeting to ensure that your audio settings are configured properly.

  1. Connect your microphone or headset prior to entering the meeting. Adobe recommends USB headsets for use with Adobe Connect.
  2. Ensure that your PC or Mac recognizes your microphone. Contact the Help Desk at 940-HELP (4357) if you require assistance or encounter problems.
  3. Enter the Adobe Connect meeting, click the Meeting menu at the top, and then select Audio Setup Wizard....
  4. You will be presented with the welcome screen. Click Next.
  5. You will be asked to test sound output. Click Play Sound and ensure you can hear the test sound. Once you can, click Next.
  6. You will be asked to select your microphone. Click the Select default device drop-down and select your microphone. Click Next when done.
  7. You will be asked to test recording in order to tune your microphone volume. Click the Record button. Adobe Flash Player may prompt you to give Adobe Connect access to your microphone; click Allow.
  8. Speak the test sentence into the microphone. Ensure that you can see the recording bar moving. When you’re done talking, click the Stop button. Click the Play Recording to hear what you’ve recorded and ensure that it’s audible. When done, click Next.
  9. You will be asked to tune your silence level. It is recommended that you do not test silence and instead click Next to skip it.
  10. You will be shown the microphone you have selected, the microphone volume you have calibrated, and the silence level. Click Finish to close the wizard.

4. Meeting Roles and User Interface in Adobe Connect

InformationEvery Adobe Connect meeting has three available user roles: Hosts, Presenters, and Participants. Depending on your role in a given meeting (and the layout chosen), you may have different interface options available to you. This guide will describe how an Adobe Connect meeting is laid out and how different roles work within it.

  • The Video pod is where attendees will see the presenter’s webcam.
  • The Attendees pod sorts users by role: hosts, presenters, or participants.
  • For hosts, the Pods menu allows for the addition of many other pods.
  • The Notes pod allows attendees to take notes during a session.
  • The Poll pod allows hosts to get answers during a presentation.
  • The Q & A pod can be a useful area to collect questions from participants. Questions can be assigned to participants.
  • Hosts can open a Web Links pod. This allows hosts to bring all users to an external web link.
  • Breakout rooms can be created by hosts. Breakout content can then be brought into the main meeting.
  • Hosts can create customized layouts for future meetings. To create a new layout, click the Layouts menu and click Create New Layout....
  • In any session, hosts have the most privileges. Presenters share many of the host’s privileges. Participants have very few privileges, though hosts and presenters can allow them access to speak and use webcams.
  • Presenters and host can use a Presenter Only Area. This area is private and is not visible by participants.

3. Participating in an Adobe Connect Meeting

InformationWhen participating in an Adobe Connect meeting, you will be presented with numerous interface options for using your webcam and microphone, setting your status, and interacting with other attendees. This guide will describe a few of the most important interface components.

  • When participating in an Adobe Connect meeting, your top menu bar will contain a number of icons: the Speaker icon will allow you to adjust your speaker volume, the Microphone icon (if allowed) will allow you to enable/disable your microphone, the Webcam icon (if allowed) will allow you to enable/disable your webcam, and the Status icon will allow you to set your status (raise hand, agree, disagree, etc.).
  • The Attendees Pod has two different view modes available: the Attendee View (Attendee View icon) for sorting attendees by role and the Attendee Status View (Attendee Status View icon) to view current attendee status.
  • The Chat pod allows you to communicate with all attendees via text. If you want to chat with a particular attendee, click on their name in the Attendees pod and click Start Private Chat.

1. Creating an Adobe Connect Meeting

InformationBefore your attendees can join you via Adobe Connect, you will need to create an Adobe Connect meeting. While meetings can be created through Moodle, this guide will instruct you on how to create an Adobe Connect meeting through Adobe Connect Central.

  1. Go to Adobe Connect Central at https://connect.butler.edu. Enter your full Butler email address (including @butler.edu, not just your username) and password and click Login.
  2. From the Adobe Connect home page, click on the MEETING button near the top next to Create New:.
  3. Enter a Name: * for your meeting. This is a required field.
  4. You can optionally enter a Start Time: for the meeting. This is not a hard limit; you can manually start the meeting at any time.
  5. You can also use the Select Template: menu to specify which meeting template to start with. Your meeting template can be changed at any time once the meeting has started.
  6. Click Next > when you have your options set.
  7. From the Select Participants page, you can click available participants on the left and click Add to make them a meeting participant. Click Search to find a particular user, and click Next > when done.
  8. On the Send Invitations screen, you can decide whether to send e-mail invitations to your participants. Click Finish when done.