Category Archives: Adobe Connect

6. Creating a meeting in Moodle

  1. Go to Moodle Course you want to set up the meeting in.
    Click on  Turn editing on.
  2. Go to the block that you want to add the meeting to. (You can add more than one meeting to your course.)
  3. Click on Add an Activity and select Adobe Connect.
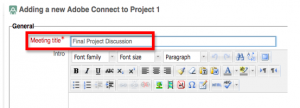
  4. Enter the name of the meeting. This is what will be displayed in your Moodle course for students to click on to enter the meeting room. Leave the Intro information blank, it will not be displayed in Moodle.Screen Shot 2015-10-07 at 8.18.03 AM
  5. The Meeting URL is optional. If you leave this blank the system will generate a random URL for this meeting. Entering a custom URL is recommended for meeting rooms that will be used frequently or for long periods of time. A custom URL can be shared with people so they can enter the room directly, without going through Moodle. A custom URL must be unique so we recommend you use your course number and a name for the meeting. See the example below.

Screen Shot 2015-10-07 at 8.19.13 AM
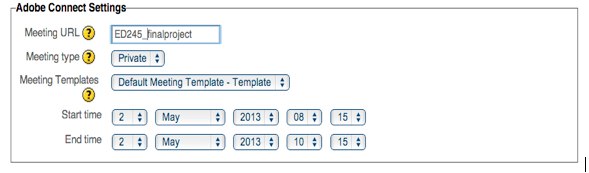
6. Determine whether you want this meeting to be public or private by selecting the appropriate option from the pop up. A public meeting is one where anyone who has the URL for the meeting can enter the room. A private meeting is one where only registered users and participants can enter. The login page does not allow guests to log in.

7. Select a meeting template and the start and end time for the meeting. The start time must be after the current time.

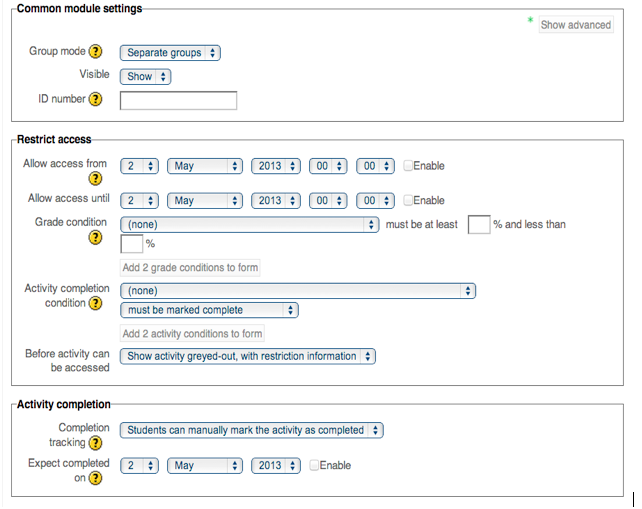
8. The rest of the settings are the common options for any activity in Moodle. Select any appropriate settings here and click on Save at the bottom of the screen.

Screen Shot 2015-10-07 at 8.20.01 AM

9.Now you have an Adobe Connect meeting room set up in Moodle.

5. Access an Adobe Connect Meeting Through Moodle

InformationAdobe Connect meetings can be accessed through a Moodle course or through the Internet. 

  1. Go to the Moodle Course or Organization where the Adobe Connect meeting has been set up.
  2. Once in the Course or Organization look for the Adobe Connect Meeting icon  Adobe Connect Meeting icon.
  3. Click on this link and you will be taken to a screen where you will see the Meeting information.  Below this information click on Adobe Connect - Join Meeting.
  4. You will be prompted to log in using your Butler credentials.  Be sure to use your entire Butler email address for the login name.
  5. Click on Adobe Connect - Enter Room.
  6. The Adobe Connect meeting room will now open in a new window.


2. Using the Audio Setup Wizard in Adobe Connect

InformationAdobe Connect includes an Audio Setup Wizard which will help you to configure, test, and volume-balance your headset or microphone for use in meetings. The Audio Setup Wizard should be used any time that you are entering a meeting to ensure that your audio settings are configured properly.

  1. Connect your microphone or headset prior to entering the meeting. Adobe recommends USB headsets for use with Adobe Connect.
  2. Ensure that your PC or Mac recognizes your microphone. Contact the Help Desk at 940-HELP (4357) if you require assistance or encounter problems.
  3. Enter the Adobe Connect meeting, click the Meeting menu at the top, and then select Audio Setup Wizard....
  4. You will be presented with the welcome screen. Click Next.
  5. You will be asked to test sound output. Click Play Sound and ensure you can hear the test sound. Once you can, click Next.
  6. You will be asked to select your microphone. Click the Select default device drop-down and select your microphone. Click Next when done.
  7. You will be asked to test recording in order to tune your microphone volume. Click the Record button. Adobe Flash Player may prompt you to give Adobe Connect access to your microphone; click Allow.
  8. Speak the test sentence into the microphone. Ensure that you can see the recording bar moving. When you’re done talking, click the Stop button. Click the Play Recording to hear what you’ve recorded and ensure that it’s audible. When done, click Next.
  9. You will be asked to tune your silence level. It is recommended that you do not test silence and instead click Next to skip it.
  10. You will be shown the microphone you have selected, the microphone volume you have calibrated, and the silence level. Click Finish to close the wizard.

3. Using Host and Presenter Controls in Adobe Connect

InformationEvery Adobe Connect meeting has three available user roles: Hosts, Presenters, and Participants. Hosts have the most privileges. Presenters share many of the host’s privileges. Participants have very few privileges, though hosts and presenters can allow them access to speak and use webcams.

  • Presenters and Hosts can work in a “Presenter only area.” This is a private area that participants do not have access to. To access this view, click the Meeting tab, and click Enable Presenter Only Area.
  • Once this feature is enabled, the presenter can add speaking notes that will not be visible to all participants.
  • Hosts determine what role others in a meeting will play. To change an attendee’s role, click the attendee’s name, and change the role in the menu that pops up.
  • The host can also drag and drop the attendees from one place to another in the Attendees pod. The host can also drag and drop multiple attendees at once.
  • The presenter and host can force participants to see a presentation in Full Screen.
  • When the Sync button on the bottom right is gray (Sync), that means that the screen is active and participants see any changes that happen in the meeting area.
  • The presenter can also allow participants to navigate the slide menu on their own.
  • Participants can navigate through the slides, search the slides, and read the publicly accessible notes.
  • The Show side bar icon allows the presenter to access slides in any order, review slide notes, and search for content.
  • Most presenters keep the navigation side bar private. 

1. Sharing Screens and Applications in Adobe Connect

InformationBy using the Share pod in Adobe Connect, you can display the contents of your screen or individual application windows for your participants to view. You can also annotate your shared screen.

  1. To get started, click the Share My Screen button in the middle of the Share pod.
  2. A dialogue box will pop up. You will have three choices: Desktop, Applications, and Windows.
  3. All attendees will see mouse movements and anything the presenter types.
  4. To annotate the session, you can click the Adobe Connect icon in the system tray or dock. Click Pause and Annotate from the context menu that appears.
  5. At the top of the share pod, all of the whiteboard tools (Whiteboard tools) are available. You can use these tools to make notes on the screen without affecting the actual desktop applications that are in use.
  6. You can also allow participants to edit the presentation by changing their roles to Presenter.
  7. When done annotating, click the Resume button.
  8. A participant can request access to edit the presentation. A small popup box will appear in the lower right portion of the screen. The presenter or host can accept or deny this request.
  9. To stop sharing, you can click the Adobe Connect icon in the system tray or dock and click Stop Screen Sharing.

2. Setting Meeting Preferences in Adobe Connect

InformationIn addition to providing options for pod selection and layout, Adobe Connect will also let you change more technical preferences for the meeting in order to adjust what your participants see and hear and limit how much bandwidth your meeting requires.

  • To change preferences, open the Meeting menu and click Preferences....
  • In the General section, you can select a background image for the meeting and set whether participants can see your mouse cursor.
  • In the Room Bandwidth section, you can optimize the meeting bandwidth for your participants’ specific connection types.
  • In the Audio and Video sections, you can choose settings for your microphone and/or webcam and set your audio/video quality.
  • In the Screen Share section, you can set quality and frame rates for screen sharing (e.g. low for Powerpoint presentations, high for demonstrations, etc.).

2. Sharing Digital Video in Adobe Connect

InformationBy using the Share pod in Adobe Connect, you can display digital video in an Adobe Connect meeting for your participants to view. Be advised that only Flash video (.flv) files can be shared this way in Adobe Connect.

  1. From within the Share pod, click the Down arrow button and select Share Document.
  2. Click the Browse My Computer... button and locate the video you wish to share.
  3. Adobe Connect will prepare the file for sharing. When done, it will place the video player in the Share pod.
  4. Click the Play button to play the file.

LightbulbAdobe Connect may compress your video file to conserve bandwidth. As a result, the video may be pixellated or artifacted. If this proves distracting or problematic, you can re-size the Share pod in order to make it smaller and make the video artifacts less noticeable.

6. Using the Chat and Q&A Pods in Adobe Connect

InformationThere are two pods in an Adobe Connect meeting that can prove very useful for interacting with your participants. One, the Chat pod, allows you to communicate via text to everyone in the meeting or specific participants. Another called the Q&A pod is useful for taking questions from and assigning questions to participants.

Using the Chat Pod

  • The Chat pod allows you to communicate with all attendees via text. If you want to chat with a particular attendee, click on their name in the Attendees pod and click Start Private Chat.
  • To change the formatting of your text (size, color, etc.), use the Pod Options button in the upper-right.
  • When there is a new message sent via the Chat pod, the tab at the bottom of the chat pod where the message was sent will change color to notify you.

Using the Q&A Pod

  • To add the Q&A pod, click the Pods menu and select Q & A.
  • You will see a list of questions as they’re posed by participants. You can click on this question and use the text box at the bottom to respond to it. Click the Send Privately button to send a private response to the asking participant, or click the Send to all button to send a response to all participants.
  • With a question selected, you can also click the X button to delete the question or use the Assign To menu to assign the question to someone to answer.

4. Meeting Roles and User Interface in Adobe Connect

InformationEvery Adobe Connect meeting has three available user roles: Hosts, Presenters, and Participants. Depending on your role in a given meeting (and the layout chosen), you may have different interface options available to you. This guide will describe how an Adobe Connect meeting is laid out and how different roles work within it.

  • The Video pod is where attendees will see the presenter’s webcam.
  • The Attendees pod sorts users by role: hosts, presenters, or participants.
  • For hosts, the Pods menu allows for the addition of many other pods.
  • The Notes pod allows attendees to take notes during a session.
  • The Poll pod allows hosts to get answers during a presentation.
  • The Q & A pod can be a useful area to collect questions from participants. Questions can be assigned to participants.
  • Hosts can open a Web Links pod. This allows hosts to bring all users to an external web link.
  • Breakout rooms can be created by hosts. Breakout content can then be brought into the main meeting.
  • Hosts can create customized layouts for future meetings. To create a new layout, click the Layouts menu and click Create New Layout....
  • In any session, hosts have the most privileges. Presenters share many of the host’s privileges. Participants have very few privileges, though hosts and presenters can allow them access to speak and use webcams.
  • Presenters and host can use a Presenter Only Area. This area is private and is not visible by participants.

3. Participating in an Adobe Connect Meeting

InformationWhen participating in an Adobe Connect meeting, you will be presented with numerous interface options for using your webcam and microphone, setting your status, and interacting with other attendees. This guide will describe a few of the most important interface components.

  • When participating in an Adobe Connect meeting, your top menu bar will contain a number of icons: the Speaker icon will allow you to adjust your speaker volume, the Microphone icon (if allowed) will allow you to enable/disable your microphone, the Webcam icon (if allowed) will allow you to enable/disable your webcam, and the Status icon will allow you to set your status (raise hand, agree, disagree, etc.).
  • The Attendees Pod has two different view modes available: the Attendee View (Attendee View icon) for sorting attendees by role and the Attendee Status View (Attendee Status View icon) to view current attendee status.
  • The Chat pod allows you to communicate with all attendees via text. If you want to chat with a particular attendee, click on their name in the Attendees pod and click Start Private Chat.