Category Archives: Panopto

04. Availability of Recordings

Information You can now designate the time frame a session is available. You can set this at the folder or session level allowing you to control what your viewers can see and when. This article will walk you through the steps on setting up Availability rules for your folders and sessions.

Setting up Availability on Folders

1. To set up or change the Availability rules on the folder level, we will want to locate the desired folder you wish to modify.

2.  Hover over the Folder name and click Settings. Screen Shot 2014-06-13 at 1.57.11 PM
.  This will take you tot he Folder Overview page.  You will want to browse to the Settings tab.  Screen Shot 2014-07-17 at 11.43.58 AM

3. In the Availability section you will see the option Sessions become Available Sessions become available.  Select the appropriate option:

Immediately – All sessions recorded or uploaded will become available to the viewers upon completion. This can be overridden by setting the availability per session.

Never – All sessions will be hidden from viewers by default. To make a specific session available to the viewers, you will need to set the availability on the session level.

Starting on – All sessions in the folder will be available starting at the data and time specified. This can be overridden by setting the availability per session.

4.  Select option for Sessions Remain Available. Sessions Remain Available

Forever – The viewers will never lose access to the sessions in the folder. This can be overridden by setting the availability per session.

Until – Viewers will lose access to the sessions on the date and time you can specify. This can be overridden by setting the availability per session.

Setting up Availability on Sessions

To set up or change the availability rules on the session level, we will want to locate the desired session you wish to modify. Hover over the session name and click settings. Screen Shot 2014-06-13 at 1.57.11 PM

1.  Click on the Overview tab. Screen Shot 2014-07-17 at 12.03.14 PM

2.  Select the appropriate option:

Now – The session will become available as soon as this option is checked.

With its folder – The session will follow the availability rules of its Folder.

Starting – The session will be available starting at the data and time specified.

Choosing When a Session Remains Available

1.  Select the appropriate option under Session Remains Available.  Sessions Remain Available

Forever – The viewers will never lose access to the session.

With its folder – The session will follow the availability rules of its Folder.

Until – Viewers will lose access to the session on the date and time you can specify.


5. Offline Recording

Information
There are time you may want to record content when you do not have Internet access.  This document explains how to record offline and upload content later.

You can record audio/video/screen cap/PowerPoint without network connectivity. The system will capture the content and store the material locally on the recording computer. Once network connectivity is restored, an upload of the content to the Panopto server will be initiated.

To record offline

  1. Open the Panopto Recorder and click the Log In with Moodle button. Ensure the Remember Me box is checked.
  2. Once you have logged in, click the folder selection arrow.  Down arrow
  3. Instead of selecting a specific folder, select Offline Recording at the bottom of the screen.  Screen Shot 2014-07-17 at 11.09.25 AM
  4. Click the Record button to begin recording. When finished, click Stop.
  5. Once your recording is complete, you will be taken to the Recording Status tab. To add your recording to the server, click Upload to Server Screen Shot 2014-07-17 at 11.11.29 AM  and select a folder.

07. Merge and Copy Sessions

InformationSession copy can now be done with a single click. The Merge function still allows you to repair separated recordings as well. Separated recordings may occur when Sessions are being captured from two or more computers.

Since Panopto allows you to record Audio and Video from one computer and secondary sources like PowerPoint and Screen Capture from another, it’s possible that these streams get recorded to two separate Sessions (one with video/audio and one with screen capture/ PowerPoint).

Session Merge

  1. Go to http://butler.hosted.panopto.com and log in via Moodle. Be sure to use an account that has Creator access to the Folder that the content has been recorded to.
  2. Once you have found the Folder, mouse over the session name and click on Settings .Screen Shot 2014-06-13 at 1.57.11 PM
  3. On the Settings page, select the tab labeled Manage. Screen Shot 2014-07-11 at 11.00.53 AM
  4. Using the  dropdown menu next to Merge Into Another Session Screen Shot 2014-07-11 at 11.01.43 AM , select the Folder where the second session is located. Choose the session name from the second dropdown menu.
  5. After you have selected the Folder and Session to merge with, click  the Screen Shot 2014-07-11 at 11.30.14 AM button.

Copy a Session

    1. Go to butler.hosted.panopto.com and login via Moodle with your Butler username and password.
    2. Hover over the session you want to copy and click the Settings icon that appears below the name of the session.
    3. Select the recordings that you want to copy. You can select ALL of them by clicking in the box at the top of the list or you can select individual recordings by clicking in the box next to each one.
    4. Click on the Copy button button at the top of the list.
    5. Select the course folder from the Choose a folder pop up_Panoptopop up that you want to copy the recording(s) to. Make sure you have configured your new course in Panopto so it shows up in this list.
    6. Click on the Copy Button button.

06. Creating Panopto Links in Moodle

InformationThere are times you may want a Panopto recording to be in a specific module or week of the course in addition to being in the Panopto Block. You can do this by adding a link to the recording in Moodle.

Copying a Session URL

  1. Go to http://butler.hosted.panopto.com and log in via Moodle.
  2. Navigate to the folder where your session is located.
  3. Hover over any recording in the folder and click the Settings icon. Screen Shot 2014-06-13 at 1.57.11 PM
  4. In the Overview section, find the URL listed under Viewer Link.Screen Shot 2014-07-11 at 10.23.20 AM
  5. Highlight this URL and copy it to the clipboard by right-clicking and selecting Copy or by pressing Ctrl+C.

Adding Links to Moodle

  1. Go to https://moodle.butler.edu and login using your Butler username and password.
  2. Select the desired course, and determine where you would like to place the link to the Panopto recording.
  3. Ensure that editing is turned on in the upper-right of the screen, and then click on Add Resource .Screen Shot 2014-07-11 at 10.27.09 AM
  4. Select URL from the Resources list .Screen Shot 2014-07-11 at 10.29.00 AM
  5. To add a link, you must provide a name and a URL. Paste the previously copied URL to the URL field under Content by either right-clicking and selecting Paste or pressing Ctrl-V. You may also want to copy and paste the name of the Panopto recording to use in the Name field at the top so that all the names are consistent.Screen Shot 2014-07-11 at 10.31.25 AM
  6. Click Save and Return to Course.

10. Drop Box

InformationCreating a Drop Box is an easy and straightforward way to separate student recordings. Students who save to the Drop Box will be able to create their own recordings, but they will not be able to view each others recordings.

This is suitable for individual presentations, videos as assignments, oral exercises, or other situations wherein a student needs to be able to create a video, but other students should not be able to view it.

In order to create a Drop Box for a course folder you need Creator permissions for that folder.  Instructors have Creator permissions for their courses when they are provisioned in Moodle by default.

1.    Click on the Settings button located to the right of the folder name.  Gear
2.    On the Overview tab, click the Create Drop Box button.  Create Drop Box

12. Move a Session to Different Folder

Move a Session to a Different Folder

  1. Go to butler.hosted.panopto.com and login via Moodle with your Butler username and password.
  2. Hover over the session you want to move and click the Settings icon that appears below the name of the session.
  3. Select the recordings that you want to move. You can select ALL of them by clicking in the box at the top of the list or you can select individual recordings by clicking in the box next to each one.
  4. Click on the Move option _ Panopto button at the top of the list.
  5. Select the course folder from the Choose a folder pop up_Panoptopop up that you want to move the recording(s) to. Make sure you have configured your new course in Panopto so it shows up in this list.
  6. Click on the Move button button.

02. Renaming a Panopto Session Name or Folder

Rename a Session or Folder

Panopto recordings are automatically named with the date and time. If you wish to change the default name to something more descriptive, follow these steps.

  1. Go to butler.hosted.panopto.com and login via Moodle with your Butler username and password.
  2. Locate the session or folder you want to rename.
  3. Hover over the session or folder name you want to rename and click  Screen Shot 2014-06-13 at 1.57.11 PM.
  4. Within the Overview tab, click Edit next to “Name.”
  5. Type in the new name and click Save.   If you want to discard the changes, click Cancel.


8. Using the Panopto Block in Moodle

Information

Using the Panopto Block

Live Sessions
This area will display the recording sessions that are currently viewable live. Only sessions that have Broadcast Recording enabled will be viewable.

Completed Recordings
Any completed recording sessions will appear here. Clicking an entry in this list will open a Panopto player to view the session. You can also click Show All to display all sessions for the course.

Podcast Feeds
This section provides links to podcast feeds (audio or video) that can be subscribed to and updated as new recordings are completed.

Links
This area provides links to download the Panopto recorder or to edit settings for the course’s folder on the Panopto website.

3. Provisioning Your Moodle Course for Panopto

InformationIn order to prepare your course to accept Panopto recordings it must be provisioned first.  This needs to be done for each individual course that you want add recordings to.


  1. Go to the Moodle course that you want to use with Panopto.
  2. Ensure that Editing Mode is turned on. If not, you can enable it by clicking on   Turn editing on   in the upper right hand corner of the page.
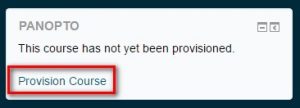
  3. Locate the Panopto  block  and click on Provision Course.

Panopto provision course button

4. Click Back to Course

back to course button

Now your Moodle course is configured for use with Panopto.  By default your students are all set up with VIEW access.


6. Using Multiple Monitors

Information


Using Multiple Monitors for Screen Capture

Installing an Additional Monitor

To add a second monitor to your computer, you’ll need to make sure that you either have a video card that supports multiple monitors, or that your computer has more than one video card. The easiest way to determine if your video card supports multiple monitors is to look at the back of your computer and see if your card has two video ports for connecting your monitors. On a laptop, this port may be on the side of your computer.

alt


Once you have made sure that your video card can support a second monitor, follow these steps to add the additional monitor:

1.) Turn off your computer and monitor.
2.) Locate the video ports on your computer. (See illustration.)
3.) Connect the second monitor to the unused video port.
4.) Plug the second monitor into an electrical power source and turn it on.
5.) Turn on your original monitor.
6.) Turn on your computer.
7.) Windows should recognize the monitor once the computer has started. If you are prompted to install driver software, see the instructions that came with the monitor.
8.) You may need to enable multiple monitor support on your operating system. Please read your instruction manual if you do not see a display on your secondary monitor.
 
When you have confirmed that the second monitor is functioning properly, you are now ready to begin screen capturing with multiple monitors.

Capturing on multiple monitors

1.) Open the Panopto Recorder.

2.) On the lower left hand side of the recorder interface, click the check box next to “Capture Screen 2”

A new tab labeled “Screen 2” will appear, displaying the output of the second monitor.

If you’d like to only capture the output from the secondary monitor, be sure to uncheck “Capture Primary Screen.” If you’d like to remove either of these streams in the future, it can be found under the “Streams” tab in the Panopto web interface.

After naming your session and selecting a folder, hit the large “Record” button to begin your recording. In the example above, both the primary screen and the second output device will be captured.