Category Archives: Panopto

3. Recording from two computers

InformationPresentations can be recorded from just one computer or from several computers.  In this Advanced Recording section, we will review the process of recording material from more than one computer. 

We will explain the steps for recording PowerPoint and/or Screen Capture from one computer and Video and/or Audio from another.

The Presenter should follow this set of instructions to ensure that their presentations can be captured by the Panopto system.

Presenting PowerPoint via Panopto Recorder
Logging In

Users are able to log in to the Panopto Recorder and begin using the system online immediately.  If the system will be used to record content Offline, make sure to check the “Remember Me” check box so your login is saved.  If the “Remember Me” option is not available, your local Panopto Administrator has removed that option for security reasons.

The Panopto Recorder can either be opened by double clicking on the desktop shortcut icon, or by going to Start — All Programs — Panopto — Panopto Recorder

When the Recorder opens, the Panopto server name should automatically be entered for you.  If not, please contact your local Panopto Administrator for the server name.

Click on Log in with MOODLE and use your Butler credentials to log in.

You will have to click the “Save” button after entering your server info before you can login.


The Panopto Recorder will open and allow you to begin recording content such as audio, video, PowerPoint slides, and screen capture.

If you already have a Folder created, you may wish to start recording to that Folder immediately.  To find your Folder, click the down arrow on the right-hand side of the Panopto Recorder.


Creating New Folders

If no Folders have been created, you will see the screen below.  If your Folder has already been created, please skip below to creating a new Session.


The Panopto web interface will automatically open and you will be brought to the New Folder screen:

The Folder Name is the long name of the series, like “Introduction to Business 101”.

The folder description can be anything you wish, and will be searchable in the web interface.

Check the box under “Allow anyone to access content in this folder” if you would like the folder to be public. This means anyone can view the folder.


Creating New Sessions

Once you have chosen the Folder that you wish to record content to, the next step is to create the specific Session within that Folder.

To create a new Session, click on “Add New Session” on the right-hand side of the Folder name.


You will be taken back to the recording screen and the date and time will automatically be used to name the new Session.  If you would like to change the name of the Session, you may do so now, by simply editing the text in the Session name field.  If you would like to change the name of a Session after recording, you may do so through the Web User Interface.


Recording Slides

Now that your Session has been created and named, you may now select the type of presentation that you’d like to complete.

PowerPoint Slides

To present a PowerPoint presentation file, click on the PowerPoint check box under “Secondary Capture Sources”.  Now click the “Open a Presentation” button and browse for and open your PowerPoint file.

The Panopto Recorder will open PowerPoint with your presentation.  You may also have the PowerPoint file open already when choosing “Capture PowerPoint” and the software will detect the opened presentation automatically.

You will receive a message after choosing your PowerPoint file that asks if you would like to begin recording after PowerPoint opens.  This allows you to begin recording immediately by clicking “Yes” without having to return to the Panopto Recorder to click the Record button.

alt
If you click “No” at the “Begin Recording?” window, you must return to the Panopto Recorder and click on “Record” to begin recording the PowerPoint slide transitions.

As seen above, the Recorder has a message that says, “PowerPoint is open but is not currently presenting.”  PowerPoint must be in Full Screen or Presentation Mode for the slides to be captured.  Once the presentation is made full screened by pressing F5 or click “Start Slide Show” that message will go away.

If Help Messages are enabled within the Panopto Recorder, you will receive the message prompt below.  This helps ensure that the presenter understand that they are recording PowerPoint or Screen Capture only with no audio or video selected.  Click OK to continue and begin recording.

alt

While presenting, the Panopto Recorder will record all slide transitions along with time stamps of each transition.  This will synchronize the audio, video, and PowerPoint slides when viewed.  The software will also extrapolate the slide text and make that text searchable in the Panopto Viewer.


Recording Screen(s)

To record a presentation while capturing the contents of your computer screen, click on the “Capture Screen” check box under “Other Capture Sources”.

Screen Capture will appear in the right-hand window as an active device and will immediately start showing you a preview of what the Recorder will be capturing.

To start recording, click “Record”.

Recording a second screen

To capture a secondary screen, make sure your additional monitor is detected and click the box next to “Capture Screen 2” to select this option. You can capture two screens at once by checking both boxes under “Primary Screen” and “Screen 2.” For more information please click here.

To start recording, click “Record”.

If Help Messages are enabled within the Panopto Recorder, you will receive the message prompt below.  This helps ensure that the presenter understand that they are recording Screen Capture or PowerPoint only with no audio or video selected.  Click OK to continue and begin recording.


alt


Recording with multiple computers

This recording scenario assumes that the presentation content is being captured on another computer.

In a two computer recording scenario, the PowerPoint and/or Screen Capture is being recorded from one computer and the audio and/or video can be captured from a separate computer.  If the same Session is chosen, the two separate recordings will be combined and synchronized on the Panopto Server and the recording will look as if it were all recorded from one physical computer.  This section will review the options for recording audio only or audio + video.  Presentations will not process through the Panopto system unless they have at least audio or video recorded to that same session. This process can be done with with both Windows and Mac computers (both of the same or a mixture of the two).

If you will be recording audio/video in this dual computer scenario, you’ll want to choose the same Session as the presenter has.  To do this, click on the down arrow on the right-hand side of the Panopto Recorder.

In this window, you can create a new session if one has not been created already, or you may select a Session that has already been started.  The person capturing PowerPoint/Screen Capture and the person capturing audio/video will need to ensure that they are choosing the same Session.  Naming the Session with the same name will not accomplish this.  One person will need to create a Session first and the other must choose it from this window.

alt

In this example above, the Session named “Session” has already been created by the presenter capturing PowerPoint and Screen Capture.  We will choose this same session and begin choosing our devices to record with.

Selecting Input Devices

To choose your video device, use the Video drop down box under Primary Source.
In this example, you can see that a Microsoft LifeCam VX-3000 web camera is attached to the system.  Panopto will detect a wide range of web cameras, DV cameras, as well as video capture cards and devices.  If your device does not show up in the Panopto Recorder, please make sure that you have the latest drivers available from the device manufacturer and ensure that all cables and power are connected to the device.

To choose the video camera, simply click on the drop down window under “Video” in the Primary Source area.

alt

Then select a camera from the drop down list.

alt

You should now see a video feed in the “Primary Source” window.

alt

To choose your audio device, click on the Audio drop down box under Primary Source.

alt

Then select an audio source from the drop down menu.

alt

In this example, you can see that we have the option of choosing one of two different audio devices.  We can choose the integrated microphone (SoundMAX Integrated) or we can choose the LifeCam Cinema microphone.

An audio volume meter will appear and will show you the recording audio level of the camera.

alt

If the audio meter does not show any audio input at all, you’ll want to ensure that the microphone is not muted and that the recording levels within Windows are turned up.

Now that your audio and video devices have been chosen, you may begin recording at any time.  The final presentation will be synchronized by the audio/video start time.  The Presenter recording PowerPoint/Screen capture may also start recording when they are ready.

To start recording, simply click ‘Record’.

alt

When you have finished recording, click on the ‘Stop’ button to end your session.

alt


5. Record Mic and System Audio

InformationThese instructions will show you how to set up Panopto to record the mic and system audio simultaneously.

Setting System Audio Up

To record System Audio, and a microphone source simultaneously in Panopto’s Windows Recorder open the Control Panel, and navigate to “Hardware and Sound” and click “Sound” – this dialog box should appear:

If “Speakers” are not currently set as the default playback device set them to default now.

Click the “Recording” tab.

If “Stereo Mix” is not one of the options under the “Recording” tab – right click, and select “Show Disabled Devices” so that it is active.

Enable “Stereo Mix”

Set “Stereo Mix” to default device, and the Microphone that will be used for recording in Panopto to “Default Communications Device”

Right click the Microphone that will be used for recording, and click “Properties”

Under the “Listen” tab enable “Listen to this device” and click OK.

Recording

Open the Panopto Recorder application.

Set the Primary Source Audio to Stereo Mix

The Panopto Recorder will now capture System Audio, and the Microphone source simultaneously!


2. Installing PC Recorder

InformationThis document will walk you through installation of the Focus Recorder on a Windows based computer. 
The software can generally be run successfully on any computer that can run Windows Vista, Windows 7, and Windows 8.1 with the biggest consideration being given to having plenty of hard drive space available for long lectures.

Specifications

  • Windows Vista / Windows 7 / Windows 8.1
    (32 and 64 bit) / Mac OSX 10.6(and above)
  • Adaptive Streaming Capture Format Disabled: Core 2 Duo 1.8ghz / 2GB RAM (recommended)
  • Adaptive Streaming Capture Format Enabled: Standard/High: Intel i3 2.5 ghz or 2.6ghz AMD Phenom IIX4 910.Ultra: Intel i7 2600 Processor (3.4GHz) or 3.2ghz AMD Phenom II X6 1090T
  • Mac: Intel CPUs required
  • Microsoft .NET Framework 3.5 SP1
  • Recording Quality Options: High– 540MB/hr, Standard– 135MB/hr
  • FireWire ports for digital cameras
  • Windows Media Player 10 (or higher) required for broadcast
  • USB ports for Webcams or other recording devices
  • Disable sleep mode, screen savers and scheduled tasks

Installation

Step 1.)  Go to butler.hosted.panopto.com and click on “Log In”.  Choose Moodle, from the “Log In Using” drop down box. Log into Moodle using your Butler credentials. You will be automatically redirected to the Sessions page.

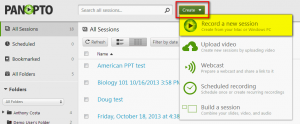
Step 2.) You can download the Recorder by clicking on the “Download Recorder” button on the Portal Page

rtaImage

You could also click this button as well, located in the top right of the sessions page.

rtaImage (1)


Both options will show a popup that will allow you to download the Recorder for your operating system.

 rtaImage (2)

Step 3.) Locate PanoptoRecorder.exe that you’ve downloaded and run the application

Step 4.) The installer will self extract and begin the installation.

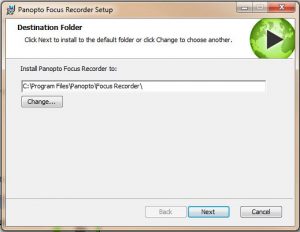
Step 5.) Select a destination folder to install the recorder to. Click Next.

rtaImage (3)


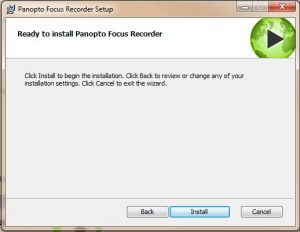
Step 6.) Click Install and the installation will begin.

rtaImage (4)


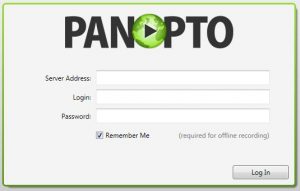
Step 7.) Once the Recorder is installed you will be able to open the software. Login using the proper Server Address, Username and Password. (This information can be obtained from a Panopto Administrator at your organization).

rtaImage (5)


1. How to Live Broadcasting

InformationPanopto has the ability to broadcast all recordings live over your network or the Internet.

Panopto has the ability to webcast all recordings live over your network or the Internet.

How to Live Webcast

From the Panopto Recorder, be sure to select an online folder, then check “Webcast”.

User-added image

Record and Stop

To start the broadcast simply click the RECORD button. To end the live broadcast, simply click the  STOP button. Your recording will then complete and upload to the server.

User-added image        User-added image

Viewing

A viewer URL is generated after your broadcast starts. This URL can shared through the web user interface by clicking “Share”. Clicking “Copy” will copy the URL to your Windows clipboard.

User-added image

Users may login to the Panopto website to view any live broadcasts that may be available at that time.

To do this, simply go to your Panopto server’s website, and click the live session that you would like to watch.  If access to the content is restricted to certain viewers, they will have to login with their credentials.

You can determine which sessions are broadcasting live because the icon will look like the following:

User-added image

The viewer can click on the session and a viewer window will open just as it would if the lecture had been previously recorded.

Pause, rewind and go live feature

User-added image

Buttons for pausing and rewinding are pictured above on the left. You can easily seek through a live broadcast to any time by dragging the slider circled above, even if you join late. To catch up and watch the broadcast live, just click the “LIVE” button as seen above. You may also continue to watch the live broadcast even after it has ended.

Questions, Comments, and Notes

During the live broadcast, viewers who are logged in and viewing the live broadcast can ask questions and make comments via the viewer window. The questions and comments have been merged into a “Discussion” section in the viewer. Furthermore, viewers can also take public or private notes during the broadcast to refer back to at a later time. Questions, comments, and notes are stored by the server for review at a later time, even after the broadcast has ended.

User-added image
The viewer’s discussion questions pop up and notify the Creator in the lower right hand corner of their display. Clicking on the notification will launch the recorder. To disable this notification, from the recorder – go to Settings – Basic Settings – Uncheck “Notify me when a viewer asks a question”.

User-added image

Creators can either respond verbally at the time of the question or review the questions after the recording is complete.

User-added image

You can also turn off discussions for any or all webcasts and recordings by going to the Panopto web administration pages under System> Settings and changing the Discussion Enabled setting to False. Ratings can also be disabled separately by changing the Ratings Enabled setting to False.

5. Using the iPhone App

Information


This page shows how to use the Panopto iOS application on an iPhone.

Login

To log in to the iOS app, swipe the screen to the right or click the menu button in the top left corner, and then tap “Sign In”.

iphone pic

Enter your server name (butler.hosted.panopto.com), and then tap “Sign In”.

2

Then your username and password and click “Sign In”.

3

View Panopto Sessions

To view sessions on the Panopto server, tap the menu button, and tap “All Sessions” to see all of the sessions that your account has access to. Tap the recording to begin playing it.

4

You can also choose “Folders”, which will show you a list of folders that your account has access to.  You can tap the folder to show a list of recordings in that folder.  Tap the recording you would like to view, and it will play.

5

Viewer Overview

Playing a session will stream the MP4 version of the session (to use search and see events, captions, and navigational thumbnails use the app on an iPad)

6

Tap the screen to show the option to seek, adjust volume, rewind 30 seconds, play/pause, and fast forward.

7

Create a Recording

To create a recording, tap the menu button or slide to the right, and tap “Record and Upload”.

8

Choose the folder where you would like the session to be stored.

9

Enter a session name, and tap “Record a new video” and begin recording your session.

10

Once you are finished recording, you may preview the video by tapping “Play”.  You can tap “Retake” to record again, or “Use” if the video is acceptable.

11

Tap “Upload” to begin uploading the session to the Panopto server.

12

Upload Existing Video

To upload an existing video, first tap the menu button or slide to the right, and then the “Record and Upload” button.

8

Tap the folder where you want to create the session.

14

Enter a session name, and select “Choose a Video”.

15

Select the video you wish to use.

16

At this point, you can choose to preview the video by tapping “Play”, change the video by going back to the Videos folder by tapping “Cancel”, or tap “Choose” to use the video.

17

Finally, tap “Upload” and it will upload the video to the folder you chose.

18

FAQ

What is the capture resolution?
The iOS application will capture at 480×368.

How much storage is required?
The storage required is 4mb/minute (240mb/hour).

4. Using the iPad App

Information
This page shows how to use the Panopto iOS application on an iPad  

Downloadable Mobile User Guide

 Login

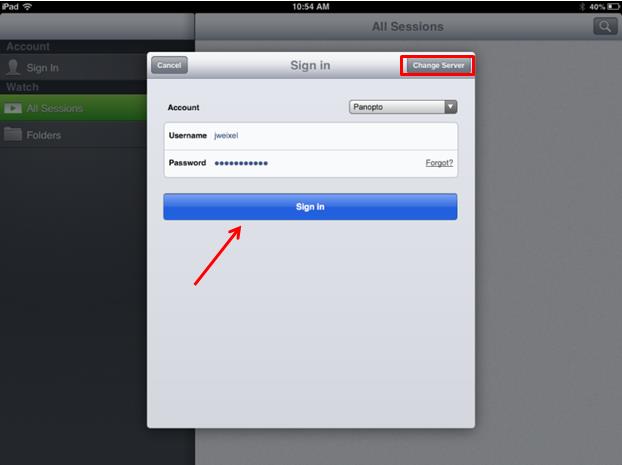
To log into the Panopto iOS App, tap “Sign In” in the top left corner.

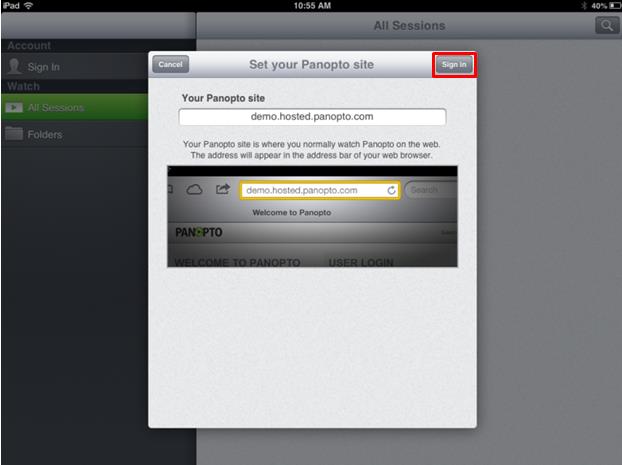
1_2In the Sign In window, tap the “Change Server” button in the top right of the Sign In window to enter your server name (butler.hosted.panopto.com), and then tap “Sign In”.  This will take you back to the login screen; select Moodle from the drop-down menu and enter your Butler username and password.  Once they are entered, click “Sign In”.
3_0

2_0 Panopto Sessions

You can view all of the sessions that your account has access to by tapping “All Sessions”. On this view you can select the session you’d like to play by tapping on the session.

13You can also choose “Folders”, which will show you a list of folders that your account has access to.  You can tap the folder to show a list of recordings in that folder.  Tap the recording you would like to view, and it will play.
14

Viewer Overviewcaptions

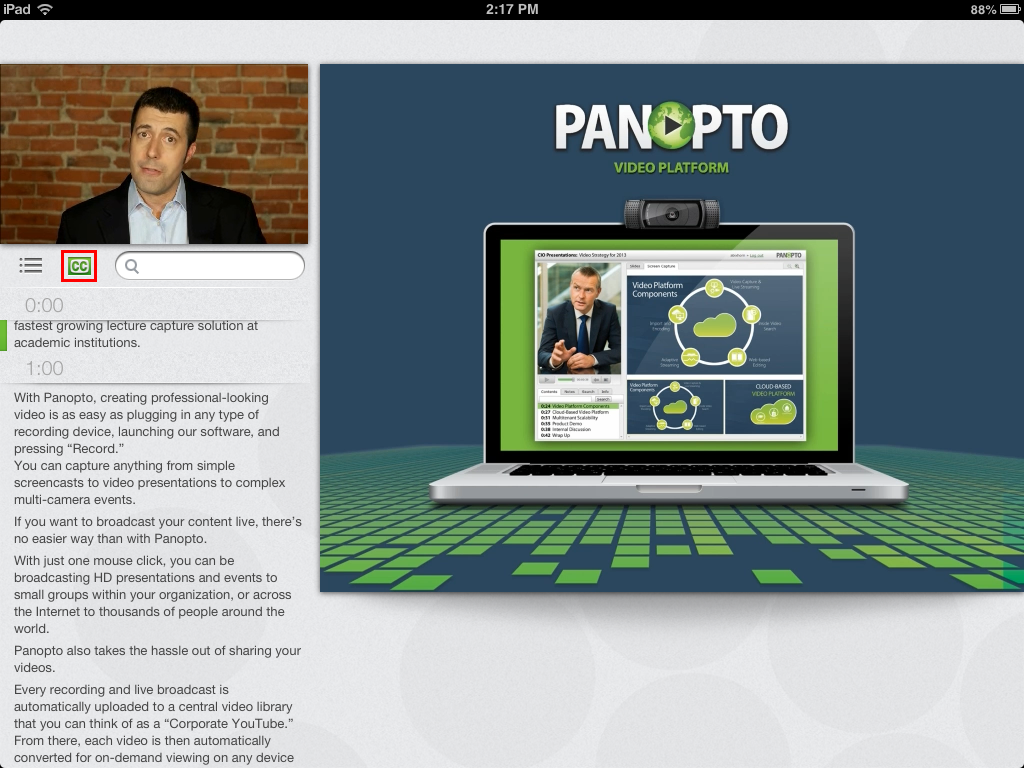
When viewing a session you can see and search the  slides and events for the session as well as the captions (If applicable).

15If your recording is encoded with captions, tapping the Captions button will bring up the captioning for the session.
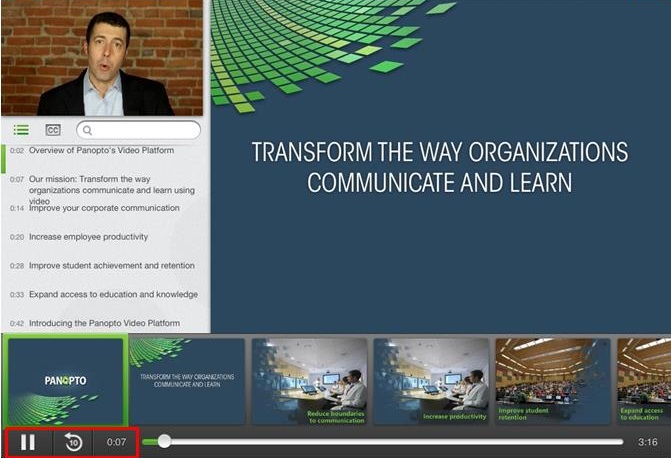
captionsTapping the screen will show the thumbnails for each event in the recording. This will also show the option to Play/Pause, rewind 10 seconds, and the current time of the recording (displayed in the red box below).

16_0

 Create Recording

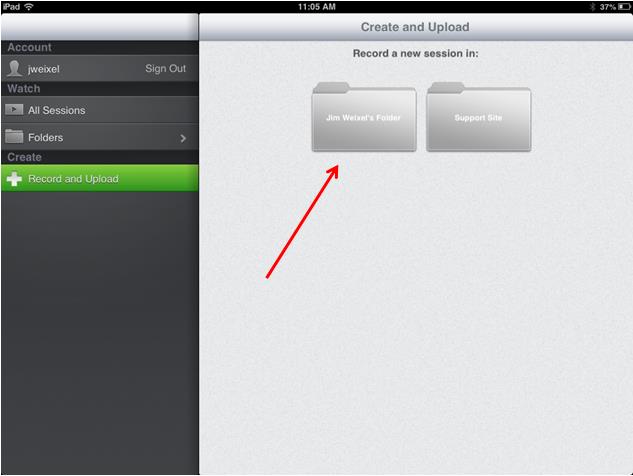
To create a recording, tap “Record and Upload” on the left menu, and tap the folder where you want to store it.

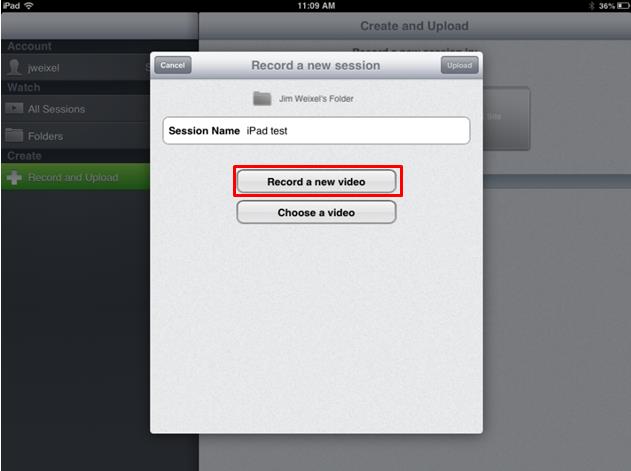
4_0Enter a session name, and tap “Record a new video” to begin recording.

5_0

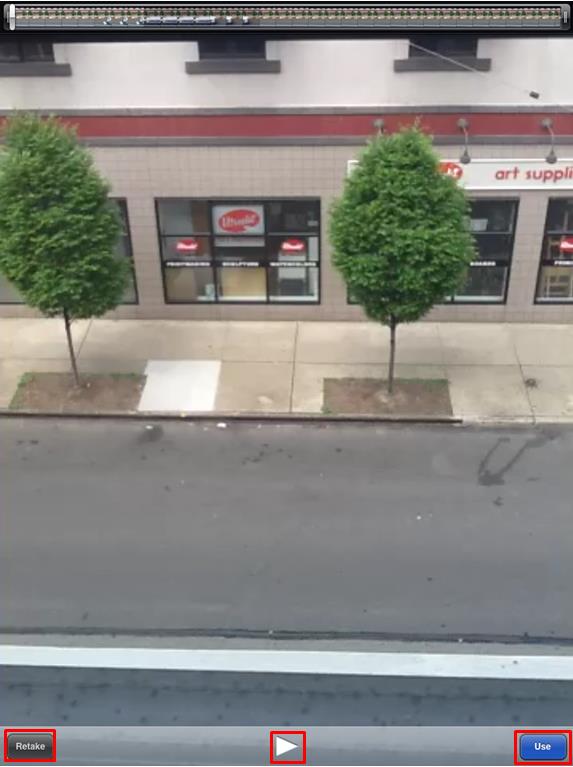
Once you are finished recording, you may preview the video by tapping Play.  You can tap “Retake” to shoot the video again, or “Use” if the video is acceptable.

6_0

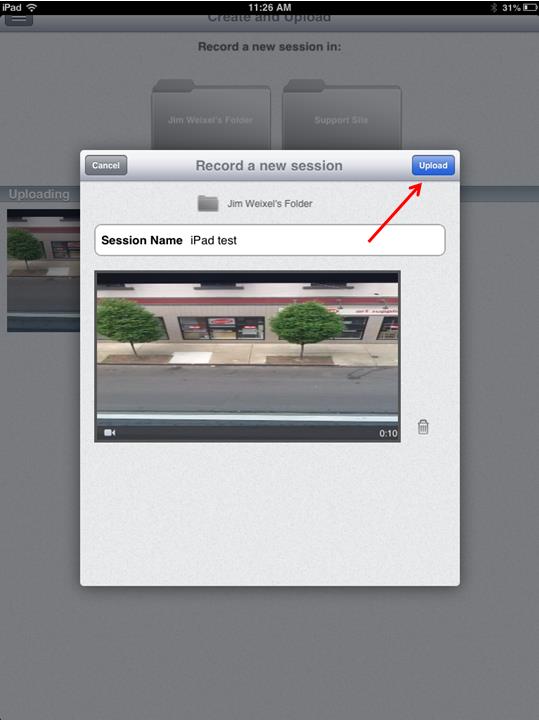
Tap “Upload” to upload your recording to the Panopto server.

7_0

Upload Existing Video

To upload an existing video, tap “Record and Upload” button in the left menu and tap the folder where you want to create the session.

8

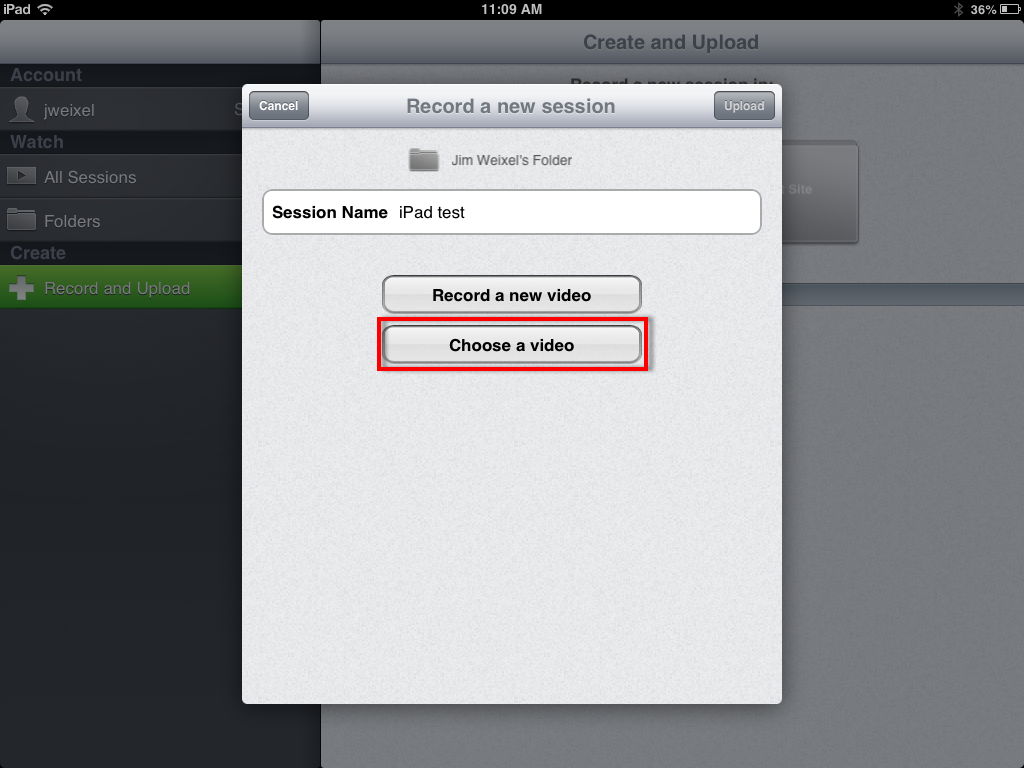
Enter a session name, and tap “Choose a video” to upload a video from your iOS device.

choose

Select the video that you wish to upload.

10

At this point, you can choose to preview the video by tapping Play, change the video by tapping “Videos”, or tap “Use” to use the video.

11

Finally, tap “Upload” to upload the video to the Panopto server.12

3. Logging into the IOS through your browser

InformationThis page shows how to use the Panopto iOS application on an iPad through your browser. To record with the iOS App your Panopto server must be 4.3 or higher. 

Login

Open your browser and navigate to your Panopto site (butler.hosted.panopto.com).

Select “Stay on the web”

Select Moodle as your provider and enter your Butler Username/Password.

Launch Application

Select “Panopto App” to launch the Panopto Application

You should now be logged-in! You can now browse Panopto for your sessions. Please see our iPad doc for more information!

2. Android App

InformationThe Panopto app will run on any Android tablet or phone running Android 4.0 or above. The app also supports the Kindle Fire with the exception of the 1st Generation Kindle.

Downloading the Panopto App

Android tablet and phone users you can download the app via the Google Play App Store. Just search for Panopto and click install!

For Kindle Fire users, go to the Amazon App Store and search for Panopto! Click continue and install!

Using the App for the first time

On your tablet or phone click the Panopto App icon.

You will be prompted to log in. If you are not prompted, click sign in on the top right of the screen. Type your Panopto server URL, the same address you use to view Panopto recordings on the web! Click OK.

Now you will be asked for your username and password. Please enter your credentials and click Sign In!

Browsing and searching for recordings

You will now be shown all recordings you have access to, sorted by date, showing most recent first.

To search for a recording, click the magnifying glass on the top right of your screen. Type the term you wish to search for and click search!

You will now see everywhere that your search term is mentioned. To access the recording just click on the thumbnail!

The Tablet Viewer

You are now viewing a Panopto recording. You can pause the recording by clicking pause, or skip back ten seconds by clicking the rewind button shown below.

You can also drag the progress indicator to seek the recording. To search a recording, click on the search bar below the primary video on the left. Type the search term and click search!

Anywhere your search term shows up in the recording will now be listed in the results. Click the timestamp and you will be taking to the that part of the recording!

The Phone Viewer

The phone viewer will stream the podcast of the Panopto recording. You can rewind 5 seconds by clicking the rewind button and fast forward 15 seconds by clicking fast forward.

1. Collecting IOS Logs

Information

In order to give us substantial information for logging bugs for our iOS apps, you will first need to download the appropriate utility for your operating system:

For Windows: http://support.apple.com/kb/DL1466For Mac: http://support.apple.com/kb/DL1465

*Before we begin, you must have your apple device connected and recognized by your computer.

Step 1.)

After installing, run the “iPhone configuration utility”

alt

Step 2.)

This will take us to the main page of the utility, on the “Devices” page.

alt


Click on your apple device under “Devices.” In this example, we are grabbing logs from PanPod.

Step 3.)

Click on the tab entitled “Console” at the top right.

alt

This is where we will see our log report.

alt

*Please note that if you have had your iPod connected for sometime, you may need to clear the logs if you are trying to reproduce an error. Apple devices log many lines of code, so it is helpful to clear out the logs before reproducing an error so we can pinpoint the trouble area. To do this, click on the “Clear” button before using your apple device to use the iOS recorder.

In order to help us, please save the log as soon as you receive an error; do not keep using the apple device after the error if at all possible, as this will create more entries in the log.

Step 4.)

Click on “Save Console As…” to save the console.

alt

Select the name for the log, and the folder that you would like to save the file to.

This is the log you will upload when sending reports to Panopto.

8. Webpage Embedding

InformationWhile viewing a presentation in Focus 4.5, you can now add a URL to your presentation that will open in a new tab during session playback.

This feature will only work if the viewer has an active internet connection while viewing a presentation. It will not load if viewed or downloaded offline.

Step 1.) Locate the session you would like to embed a URL to, and click the “EDIT” button.

This opens the Panopto Editor.

alt

Step 2.) Method 1

Choose the event where you would like the webpage to load.

There are two ways to add a URL to our presentation. First, we will cover editing an event that already exists in a stream such as Powerpoint slides and their transitions.

Click on an event on the timeline, or click the “EDIT” button on a related event.

alt

On the left side, if you hover your mouse over a slide event, click the edit button. We can also do this on “Streams” tab…

alt

Or we can do this on the “Slides” tab…

alt


Conversely, on the right side of the screen, hover your mouse over the bottom highlighted timeline and click on “Click to Edit” where you would like to insert a URL.


alt


Using either method will open the following screen:


alt

Click on the tab entitled “URL” and type out the web address of the site you wish to embed to your presentation.

***It is very important that you add “http://” before the URL like the example above. If not, the link may not work while it is being viewed.***

Click “OK” when you are finished.

Step 2.) Method 2

Instead of editing an existing event, we can add a new event to connect to our URL.

alt


On the bottom left, you can click on “Add a new event.”


On the right hand side, in the upper timeline, you could also right click on the area you would like to add your URL. This will open the following menu:

alt

Click on create event.

Both methods will open the following window:

alt

If you clicked the lower left “Add new event” button, you will need to modify the “Time” section to signal the URL to load.

***It is very important that you add “http://” before the URL like the example above. If not, the link may not work while it is being viewed.***

Click OK when you are done.

Step 3.) Save your changes

When you have made your edits and are ready to save, click the Save or Save As button in the top right corner.

Clicking Save will display the screen below.

Clicking Save As will prompt the save as window below.

After you are finished saving, exit out of the editor.

Viewing your changes

If you open your session in the Panopto interface, you will see a new tab entitled “URL.” It will be selectable when the URL event you created begins.

Congratulations! You now know how to embed URLs into your session!